Banners Admin
There are two admin pages specifically for Banners:
- "Admin > Banners" (listing banners) (tiki-list_banners.php)
This is to create zones, define content, assign to users, define time frames, etc....
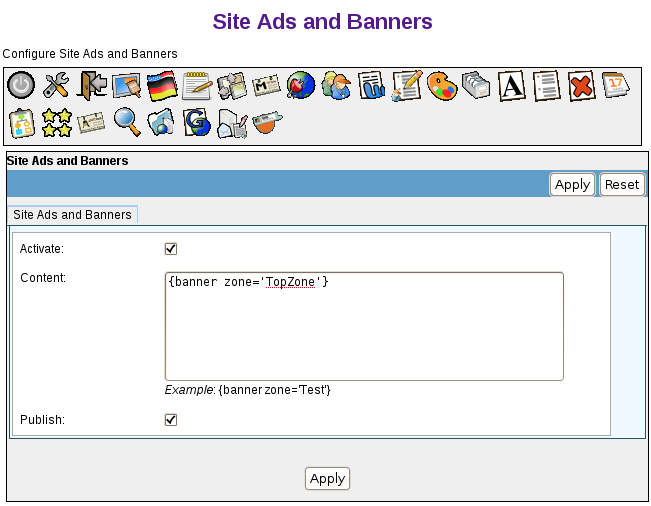
- "Banners" (admin banner) (tiki-admin.php?page=ads)
To access: Click the Banners icon on the Admin Panel
or Access http://example.org/tiki-admin.php?page=banners
The name suggests more, but at this time, this admin page is solely to add a banner zone in the site header area. The banner position varies somewhat according to the theme, and the banner zone must already be defined.
Banner Zones
A banner zone is a defined area in which to display a specific banner. You can define as many banner zones as needed for your site, then have different banners appear in each zone. For example, a typical site might have three banner zones:
- A top zone, to display a banner ad at the top of every page
- A left and/or right zone, to display an ad in the left or right column
- A bottom zone, to display another banner in the footer of the page
Creating a banner zone
Before creating a new banner, you must have a banner zone in which to place the banner.
To create a new banner zone:
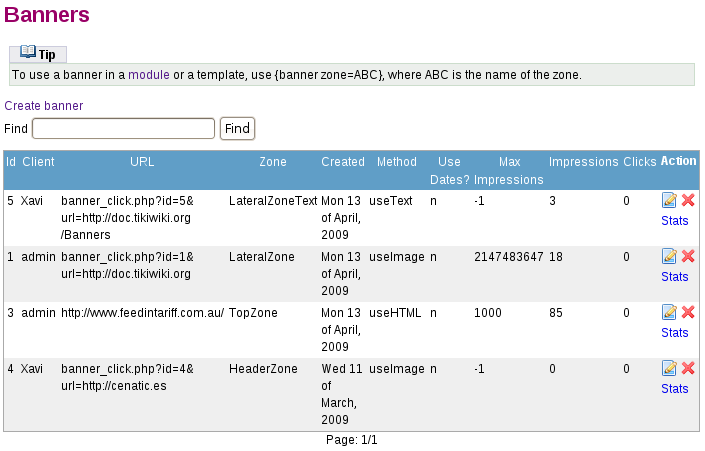
- From the Admin menu, click Banners. The Banners page appears, showing the current banners.
- Click Create banner to create a new banner zone. The Edit or Create Banners page appears.
- In the Create Zone field, type a name for the new banner zone (such as TopZone) and click Create Zone.
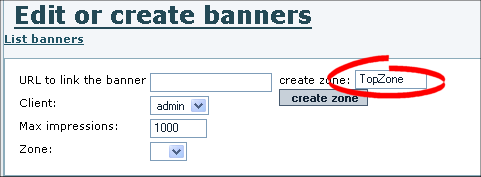
- Tiki adds the new banner zone to the list of existing zones (at the bottom of the page).
Now that you have a banner zone, you're ready to create the actual banner.
Banner Types
Tiki can create the following types of banners:
- HTML — Complete HTML/XHTML code of the banner. For example, if you belong to a banner exchange, you may receive a code snippet to display the banner.
Note: Including a link (-+<A HREF...>+-) as part of your HTML will override the banner's URL to link field. - Image — You can upload any image (PNG, BMP, or GIF) to be used as the banner.
- Fixed URL — You can link to a banner from a hosted location. For example, if you belong to a banner exchange that provides dynamic banners, you may have a URL to use (such as http://bannerserver/mybanner?id=foo).
- Text-- A simple text-only ad. The text will be formatted using the bannertext CSS style.
Creating Banners
To create a new banner:
- From the Admin menu, click Banners. The Banners page appears, showing the current banners.
- Click Create banner to create a new banner. The Edit or Create Banners page appears.
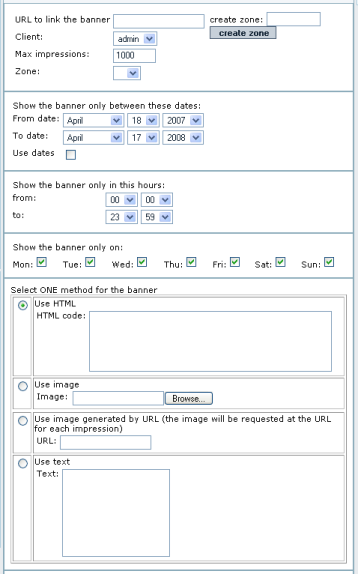
- Use this table to complete each field on the page:
Field Description URL to link the banner The fully qualified URL click-through for the banner, such as http://www.tiki.org. The URL will open in a new browser window. If blank, the banner will not be clickable.
Notes:
* If you select an HTML banner type, you must include the URL in the HTML code — not in this field.
* To track banner clicks, use:
banner_click.php?id=XX&url=http://www.tiki.org, where XX is the banner ID. The banner ID is shown on the Banners page.
* Leave this blank if an HTML banner uses Javascript from a banner service such as AdSense because that code will make the banner clickable.Client Select a username as the "client" for this banner. Clients can display the stats for a specific banner. Max impressions The maximum number of times the banner will be displayed (default 1000). After reaching this number, the banner will no longer display.
Hint: If your site has lots of traffic, increase this number.Zone Select the zone in which to display the banner. To create a new zone, in the Create Zone field, type a name for the new banner zone and click Create Zone. Show between dates To automatically turn this banner on and off at a specific date, select the Use dates option and then select a From and To date. For example, you can create a banner to display only for a specific holiday or event.
If you do not select the Use dates option, the banner will be shown immediately, and continue to be shown until the Max impressions.Show between hours Select the time of the day that the banner will display. By default, the banner will display 24-hours-a-day. Show only on Select the specific days of the week that the banner will display. By default, the banner will appear 7-days-a-week. For example, you can create a banner to display only on weekends. Banners method Select a banner type: HTML, Image, URL, or Text. URIs where the banner appears only Give the list of URIs you want the banner to only appears. The URIs are encliosed with #. Example: #/tiki/my_page#/tiki/tiki-index.php?page=my_page#. This banner will only appear in the page my_page. You can have as many banners of the zone appearing in the same URI. They will share the display. The zone when not in the URIs will display any banner with an empty URI selector. - Click Save the banner.
Now that you have created a banner and assigned it to a zone, you're ready to display it.
Displaying Banners
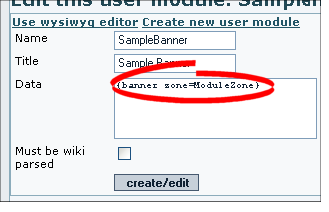
To display a banner on your Tiki you simply add the following code {banner zone=XXXXX}
(where XXXXX is the name of the banner zone):
- In a Look and Feel Admin custom code textarea
There are several of these, targeting the top of the page, below the horizontal menu (spanning all three page-middle columns, at the top of the center column, and in the page footer. - In a Tiki template (.tpl) file
This is not encouraged, due to the trouble of maintaining a custom .tpl file. - In a module
You can also use PluginBanner in a wiki page
For example:
- To have a banner appear at the top of every page, add the banner zone in the Look and Feel Admin's site header custom code textarea, or use "Admin > Admin home > Site Ads and Banners" as described at the top of this page.
- To have a banner appearing for some page in the top of the center column, you can insert into the L&F custom center column head some code like this:
{if $section eq 'forums' and $smarty.request.forumId eq 2}
{banner zone='forum2'}
{elseif $section eq 'forums' and $smarty.request.forumId eq '6'}
{banner zone='forum6'}
{elseif $section eq 'blogs' and $smarty.request.blogId eq 4}
{banner zone='blog4'}
{* add your elseif *}
{/if}
(In older versions of Tiki that don't have a L&F custom center column head textarea, you can activate the shadow layer feature and place the code in the appropriate shadow layer div. If you have an even older version of Tiki that doesn't have that feature, upgrade (otherwise the code needs to be added via .tpl file editing, and don't forget wrapping it in {literal} tags).
- To have a banner appear in the left or right column:
- Create a new module.
- Add the banner zone to the module.
We have an additional parameter target to be able to open the link in a specific window. By default the banner clicks open a new window. If you want to open the banner in the same window, use target=_self. See possible values for target
- Assign the module.
You can specify if the banner will open in the same window or in a new window. The default is a new window
{banner zone=TopZone target=_self}
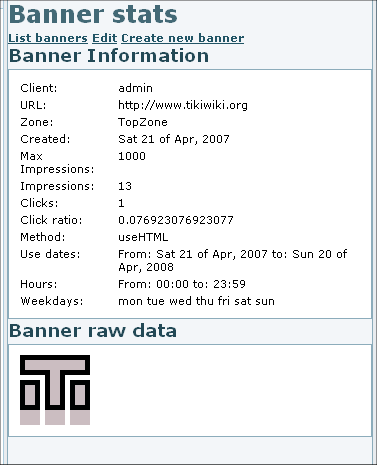
Viewing banner stats
Once banners are active on your site, you or clients can review the stats.
To create a new banner zone:
- From the Admin menu, click Banners. The Banners page appears, showing the current banners.

- Click Stats for the banner to review. The Banners Stats page appears.
Banners
Banner User
PluginBanner