구조체 관리
구조체 관리하기
위키 구조체를 관리하려면 메뉴에서 Wiki > Structures 를 선택하십시오.
- 1.9 버전에서는, 본 메뉴 선택사항은 tiki_p_edit_structures 권한이 있어야만 제공되었습니다.
- 2.0 버전에서는, 본 메뉴 선택사항은 모든 사용자에게 제공되었습니다, 하지만, 새 구조체 생성 영역은 tiki_p_edit_structures 권한을 보유해야만 제공되었습니다.
2.0 버전부터, 삭제 및 웹도움말 생성 및 트리 덤프의 기능 (이 기능에 대한 설명은 아래쪽을 살펴보십시오) 은 구조체의 '루트' 페이지에 설정된 권한 (개체이건 범주 여부와 상관없이) 을 따릅니다. 사용자가 이러한 기능들에 접근하려면 이 '루트' 페이지 상에 edit 권한이 있어야만 합니다. 목록을 보기/접근 권한 역시 '루트'페이지의 권한을 따릅니다 (이 역시 개체 혹은 범주 여부와는 상관없습니다0
1.10 에서는, "웹도움말 생성" 기능의 활성화 역시 관리 화면 내부의 Wiki Config 선택사항에 의하여 조정됩니다.

구조체
기존 구조체의 목록은 다음의 아이콘들과 함께 표기 됩니다:
아이콘 | 작업 | 설명
|
| 내보내기 | 구조체 내부의 위키 페이지의 위키 소스를 내보냅니다 | |
| 트리 덤프 | 구조체의 트리를 복사 혹은 편집에 알맞게 내보냅니다 | |

| 삭제 | 구조체와 선택에 의하여 관련된 위키 페이지들을 삭제합니다 |
| 웹도움말 생성 | 구조체에서 트리 메뉴 및 정적 HTML 페이지들을 생성합니다 | |
| 웹도움말 보기 | 생성된 웹도움말을 보여줍니다 |
새 구조체 생성하기
새 위키 구조체를 생성하려면 구조체 관리 페이지의 새 구조체 생성 영역을 살펴보십시오.
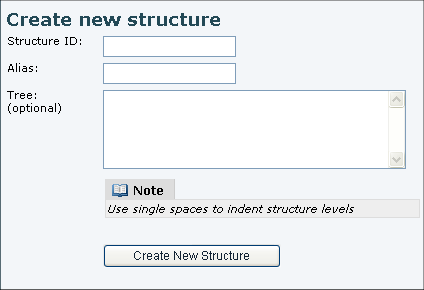
| Field | Description |
|---|---|
| Structures ID | 구조체의 "루트"로써 사용될 우키 페이지. 페이지가 존재하지 않는다면, 티키위키는 해당 페이지를 생성할 것입니다. 필수항목 |
| 별칭 | 구조체 ID 의 대체 이름. 별칭을 사용함으로써, 동일한 이름이 주어진 "것 처럼 보이는" 다른 2개의 구조체 (각각 별개의 구조체 ID를 가지고 있음) 를 생성할 수 있습니다. 별칭 선택사항 을 사용하는 것은 (소개 나 개요 처럼) 재사용될 흔한 이름을 가진 구조체들을 생성하는 경우, 또는 구조체가 동일한 페이지의 2 버전을 포함하는 경우(예: 페이지: 2.1-> 페이지: this 2.1 (별칭: this) 과 페이지: 2.2 -> 페이지:this 2.2 (별칭: this) 은 2.1->this, 2.2->this 로 표기됩니다 )) 에 유용합니다. |
| 트리구조 | 트리구조 영역을 사용하여 구조체 및 필요한 위키 페이지들을 생성하십시오. 티키위키는 자동적으로 필요한 위키 페이지들을 생성하고 구조체에 추가할 것입니다. 참조: 상세내역은 트리구조 생성하기 을 살펴보십시오. 선택사항 |
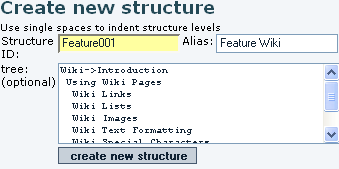
트리구조 만들기
새 구조체를 만들 때, 티키위키는 구조체 내부에 자동으로 필요한 위키 페이지를 생성할 수도 있습니다. 트리구조 항목에 각각의 위키 페이지의 이름을 추가하기만 하면 됩니다. 각 줄은 구조체 내부의 연속된 위키 페이지를 지정합니다.
- 자식 페이지를 생성하려면, 위키이름을 스페이스로 한 칸 안쪽으로 들여쓰기 하십시오.
예제:Copy to clipboard부모 페이지 자식 페이지 더 아래의 자식 페이지 - 위키 페이에 대하여 alias 를 생성하하려면 위키 이름 뒤에 -> alias 를 덧붙여 주십시오.
예제:Copy to clipboardWikipage001 -> Introduction
완성된 트리구조 의 한 예제는 다음과 같습니다:
Wiki -> Introduction
 Using Wiki Pages
  Wiki Links
  Wiki Lists
  Wiki Images
  Wiki Text Formatting
  Wiki Special Characters
 Wiki Admin -> Administration
 Wiki Details
이 덤프트리로부터 새 구조체를 생성하려면, 구조체 이름만 추가하면 되며, 선택에 의하여 alias를 추가하면 됩니다. 이 예제에서는, 새 구조체를 생성하기 위한 양식은 다음과 같습니다:
구조체의 범주화
구조체를 생성할 때, (만약 범주 기능이 활성화 되어있다면) 구조체 전체를 범주화 할 수 있는 기회가 주어집니다.
단계 및 승인 시스템 Wiki Page Staging and Approval 을 사용 중이면, 구조체를 새 범주에 할당하기 전에 먼저 기존의 범주 (승인된 것)를 삭제하여야만 합니다.
- 그렇지 않으면, 새 범주로부터의 권한이 지켜지지 않을 것입니다, 이는 비록 Otherwise the permissions from the new category will not be reguarded, even if you enabled the "(몇몇이 아닌) 모든 이에게 권한Permission to all (not just any) of an object's categories is required for access" under tiki-admin.php?page=category.
구조체에 권한 부여
If you want to set object specific permissions to the pages of a certain structure, you will have to remove the existing category, too.
- Otherwise the object specific permissions won't override the ones given by the approved-category. So the warning "These permissions override any global permissions or category permissions affecting this object." will not affect in case of using the staging and approval!
List of Structures
After you create this structure, you'll have a nine page group of wiki pages, including whatever amount of those pages that were already created in the same Tiki site. And you will see the structure listed like:

If you click on the name of the new structure created ("Feature001 (Feature Wiki)", in this example), then you will be able to manage the structure: move nodes, add brand new pages to it or from existing pages in the same Tiki (see further down), and you will be able to see the structure layout:

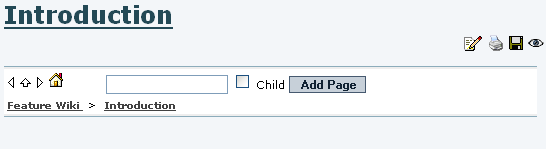
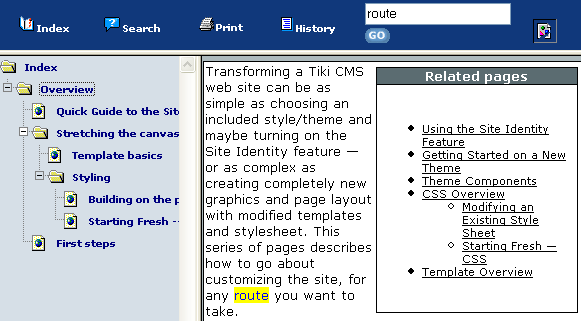
For instance, if you click on the view link, next to "1. Wiki(Introduction)" node, you will see the page "Wiki", named as "Introduction", with all the navigation aids at the top of the page.
If you add a "toc" ("table of contents" tag) to that page (regardless that you are at the root page of the structure or not), you will see the table of contents for that page (Wiki). For instance, adding this code to the page:
{toc shownum=1 }
would produce a numbered table of contents of the child pages starting from this node (but not the ones in the same level as this page or higher levels):

Tip_: See Structure User for more information on the toc__ tag syntax and optional parameters allowed.
When your user belongs to a group with the permission "tiki_p_edit_structures", you will see a mini-form on each navigation bar to create new pages if needed just after this one, or as child pages from this one if you select the "Child" check box next to it (see example just above).
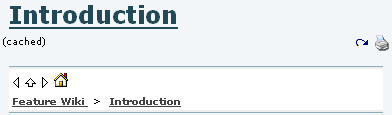
When you are not logged in, or a user in groups without this permission, you would see a plain navigation bar on top of each page:
The following sections explains you how to create, delete, move, and re-prioritize the pages in your structure
Editing an Existing Structures
Select a Structures from the list to open the 'modify structure' page. In this example, it is "Feature001 (Feature Wiki)", as seen from the list of structures:
In 1.10, the ability to edit an existing structure respects the permissions (whether object or category) set on the structures 'root' page. So a user must have edit rights on that 'root' page to be able to edit the structure. A user with view rights but no edit rights on that 'root' page will be able to access the structure tree, but not edit it.
The form at the top of 'Modify Structure' page (tiki-edit_structure.php?page_ref_id=1, in our example) indicates the current node. The default selected node is the structures 'root' page. Select an alternative structure node to edit from the 'Structure Layout' tree at the bottom of the page (selected "Using Wiki Pages" node in this example):
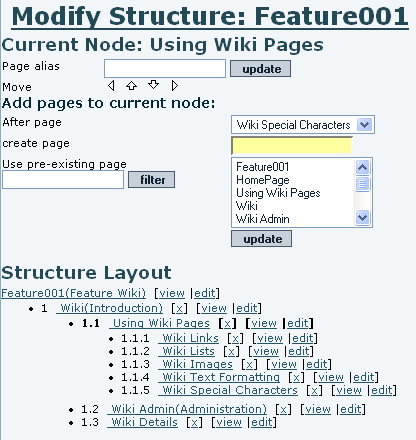
Use the 'Update' button to add or update the current nodes 'Page alias'.
Use the navigation buttons to move the current node to a different position within the 'Structure Layout'. The current node will be highlighted in bold (except the root node, which is never highlighted).
Adding Pages to Current Node
Any pages that you add will be added as sub-pages to the 'current node' and inserted after the page indicated by 'After Page'.
- If you enter a Wiki name in the 'create page' field, a new Wiki page of this name will be created. If populated, this field takes precedence over the 'Use pre-existing page' field.
- The 'Use pre-existing page' field allows the user to insert one or more existing pages. The filter field can be used to restrict the set of existant pages.
Structure Layout
The 'Structure Layout' provides links to:
- View the referenced wiki page: Only if you have the relevant permissions
- Edit the referenced wiki page: Only if you have the relevant permissions
- Remove the page reference from structure: If you click 'x' to remove a page, the system will ask if you want to remove the page from the structure or if you want to remove the page completely.
Note that if the page being removed has subpages, all the subpages will be removed recursively from the structure. (The underlying wiki pages will also be removed if you choose the 'remove page too' option)
목차
(toc 태그를 사용하는) 목차 문법 및 허용되는 선택적 변수에 관한 추가 정보는 구조체 사용자 를 참고하십시오.
Slide Show
If the slideshows feature is enabled, selecting the 'slides' button from the page bar will display structure pages as slideshows!
PDF 생성
만약 pdf-생성 기능이 활성화 되어있다면, 구조체 페이지를 보는 도중 'pdf' 아이콘을 클릭하면 구조체로부터 관련 위키 페이지들을 모아 pdf 문서를 채울 것입니다. (chris.holman: Aliases 및 toc 항목들은 현재 작동되지 않습니다)
웹도움말
기본 아이디어는 티키 구조체에서 웹도움말을 생성하는 것입니다 (구조체 = 우리가 아는 것처럼 위키 페이지의 트리구조)
구조체 메뉴에서 웹도움말을 생성하는 버튼을 확인하실 수 있습니다 (![]() ).
).
웹도움말은 whelp/$name 내부에 생성되며, name 은 설정가능하며 구조체의 루트의 이름이 기본으로 설정됩니다.
생성된 웹도움말은 구조체를 탐색하는 데 사용될 수 있는 js 트리이며, 검색 기능, 인쇄기능, 기록 및 다른 멋진 기능을 보유하는 구조체의 정적 표기입니다.
이 기능은 티키 사이트에서의 구조체를 통하여 생성하는 그 어떠한 문서를 사용자들을 위하여 유용한 형식으로 배포 라는 목표를 가지고 있습니다. 구조체는 원하는 아무때나 재생성이 가능하기 때문에 사이트의 온라인 버전을 매우 쉽게 유지할 수도 있습니다.
사용법 예제:
구조체 주시
Tikiwiki >=1.10
사용자는 구조체 혹은 하위구조체를 주시할 수 있습니다, 단 tiki_p_watch_structure 권한이 있어야 합니다. 권한을 소유한 사용자는 주시된 페이지를 루트로 하고, 그 페이지가 보유한 하위트리의 모든 페이지들을 보게 될 것입니다.
하위 트리에 어떤 페이지가 변경되거나 어떤 페이지가 하위 트리에서 삭제되거나 하위 트리로 삽입되면 매번 알림 이메일을 받을 것입니다.
1.9.1 버전에서 구조체를 생성하는 것에 대한 특이점
워드패드 같은 파일 앱을 사용하여 간단한 구조체를 생성하였다면고 한 레벨에서 다음 레벨로 갈 때 한 개 이상의 스페이스로 들여쓰기를 하였다면, 한 개의 스페이스 이상을 사용한 들여쓰기 밑으로는 별개의 구조체를 생성하게 됩니다. 스페이스 사용에 주의하시기 바랍니다.
모듈 안에서의 구조체
smarty syntax를 사용하여 모듈 내부에 구조체를 두는 것이 가능합니다
{wikistructure id=1}
tw >=4.0 에서부터는, 구조체를 메뉴처럼 표기하는 것이 가능하며, 모든 메뉴 기능에서 사용하는 것도 가능합니다, 즉 css/suckerfish 메뉴로써 표기하거나 현재 페이지에 하이라이트를 주거나 {menu structureId=1) to display a structure like a tiki collapseable menu
{menu structureId=1 css=y type=vert} to display a structure like a suckerfish menu
By using the parameter menu_cookie=n you can also have an automatic open/close of the section of the structure the displayed page is in. 이 옵션은 쿠키에 의하여 탐색하는 동안 열린 옵션 기억내용을 This option overpasses the open options memorizes during navigation by the cookies.
With tw = 6.1, the following works nicely:
Go to the Admin Modules page, click on the User Modules tab, and in the ‘Create new user module’ ‘Objects that can be included’ window select the Wiki Structure you want from the drop down list and click the green '+' button. This will insert {wikistructure id=123} into the wiki-syntax box. Take note of the actual number on your system (which is unlikely to be '123'), as I don't know of any other way of finding out your structure's number. If you want your structure navigation to wrap nicely, do these next steps.
Replace {wikistructure id=123} with {menu structureId=123 css=y type=vert}
Enter the name, title etc and Save
Click on the Assign/Edit modules tab.
In the Assign new module section, in the drop-down box, click on the module name you just created.
Then fiddle with the order, perhaps move the other modules on the left side to the right side, save it, and you have a nice navigation system.
More documentation is needed re further current options, but the above looks quite nice and will suit many needs. I couldn't get the menu_cookie=n parameter to work.