Using a Blog
A blog (short for Weblog ) is a collection of posts (submissions) by one or more authors; typically, they're sorted in reverse chronological order (most recent first). You can think of a blog as an online journal or diary. Tiki's Blog feature enables each user of a Tiki site to set up one or more blogs, and provides many (if not most) of the features you'll find in the top blog-only packages, such as Movable Type.
Depending on how the Tiki administrator has configured the Tiki site you're using, you may be able to do some or all of the following:
- See a list of all the available blogs on your Tiki site
- See which blogs are popular
- Read a blog
- Comment on a blog entry
- Print a blog entry
- Mail a blog entry to one or more recipients
- Create a blog
- Post an entry to a blog
- Edit or delete an existing post
The following sections explain how to perform these actions.
Viewing a List of Available Blogs
To view a list of available blogs, do the following:
- On the Menu, click to the left of Blog, if necessary, to see the options under Blogs.
- Click List Blogs. You'll see the Blog list, shown in the following illustration:
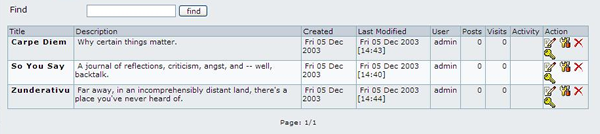
![]() If you've created a blog (and you've been granted the appropriate permissions by your Tiki administrator), you'll see icons that enable you to post to the blog, edit the blog's configuration, define blog permissions, or remove the blog entirely. The remove option is dangerous — it will remove the blog and all the entries contained in the blog! Don't click the remove icon unless you're sure you know what you're doing.
If you've created a blog (and you've been granted the appropriate permissions by your Tiki administrator), you'll see icons that enable you to post to the blog, edit the blog's configuration, define blog permissions, or remove the blog entirely. The remove option is dangerous — it will remove the blog and all the entries contained in the blog! Don't click the remove icon unless you're sure you know what you're doing.
Is the list too long for a visual search? Type part of a blog name in the Find box, and click Find.
Click one of the following column headers to change the sort order: Title, Created, Last Modified, User, Posts, Visits, or Activity. To reverse the sort sequence (ascending or descending), click the same header again.
Listing Blog by Rank
If your Tiki site has many blogs, you may wish to see which ones are more popular than others. To do so, click Rankings under Blog in the Menu. You'll see the Rankings list, shown in the following illustration:

To view the blog rankings, do the following:
1. In the first text box, select one of the following:
- Top Visited Displays the blog list with the most-visited blogs listed first.
- Last Posts Displays the blog list with the most recently updated blogs listed first.
- Top Active Displays the blog list with the most frequently updated blogs listed first.
2. In the second list box, select the number of blogs to display (top 10, top 20, top 50, or top 100).
3. Click View.
Reading a Blog
To read a blog, do the following:
- Display the blog list (see "Viewing a List of Blog," above).
- In the Title column, click the name of the blog you want to read. You'll see the blog's contents, as shown in the following illustration:
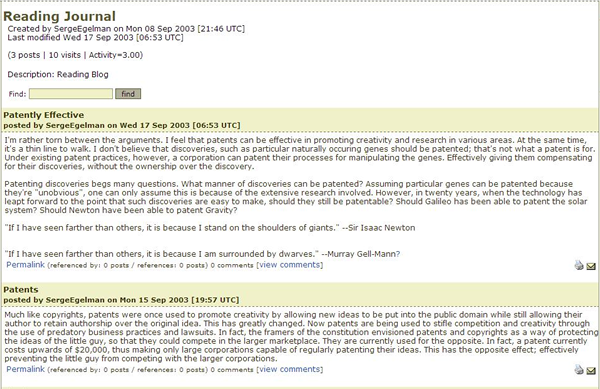
By default, blog entries are sorted in reverse chronological order, but the Tiki administrator may have chosen a different default sort order. Note that the blog header, by default, shows the blog title, the date of creation, the date of last modification, the number of posts, the number of visits (that is, by users other than the blog owner and admin), and the blog description, if any. Some of this information might not be visible on your Tiki's blogs, depending on how your administrator configured the Blog feature.
At the bottom of each blog entry, you'll see the following:
- Permalink The permalink is the unique URL of the current entry. This URL is useful for people who are reading the blog and would like to link to this entry in particular. With most browsers, it's possible to copy a link by right-clicking the link and choosing the appropriate option (such as "Copy Link Location") from the popup menu.
- Referenced By This area indicates the number of blog pages (in this Tiki site or elsewhere on the Web) that have set up a trackback to this page. For more information on trackbacks, see Blog.
- References This area indicates the number of blog pages to which this entry has sent trackback pings. For more information on trackbacks, see Blog.
If there are so many entries that they can't all be shown on one page, click Next (at the bottom of the page) to see the next page of entries; click Prev to see the previous page.
If you see a mini-calendar box in the left or right sidebars, select a date to filter the list. You'll see only those entries that were created on or before the date you select. To return to the full list, click Today.
To search the full text of the entries, type a search word or phrase in the Find box, and click Find. You'll see only those entries (if any) that contain the text you typed. To see all the entries again, leave the Find box blank, and click Find again.
Printing a Blog Entry
To print a blog entry, do the following:
- Display the blog entry that you want to print.
- Click the Print icon (located in the entry's lower right corner). You'll see the entry by itself, without the topbar or sidebars to distract from the entry's content.
- Click the Print icon on your brower's toolbar, or choose Print from the File menu.
- Click Return to Blog.
- Display the blog entry that you want to print.
- Click the Print icon (located in the entry's lower right corner). You'll see the entry by itself, without the topbar or sidebars to distract from the entry's content.
Mailing a Blog Entry's URL
To mail a blog entry's URL to one or more recipients, do the following:
- Display the blog entry that you want to print.
- Click the Print icon (located in the entry's lower right corner). You'll see the Send Blog Post page.
- In the text area, type the e-mail address to which you want to send the page. To send the page to two or more recipients, separate the e-mail addresses with commas.
- Click Send.
Commenting on a Blog Entry
You can comment on a blog entry if:
- Your Tiki administrator has given the group to which you belong permission to make comments, and
- The blog has been set up with comments enabled.
To comment on a blog entry, do the following:
- Display the entry.
- At the bottom of the entry, click View Comments.
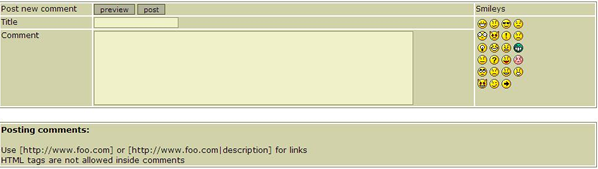
- Click Comment to display the comment composition box, shown in the following illustration.
- In the Title box, type a brief but descriptive title for your comment.
- In the Comment box, type the text of your comment.
- To preview your comment, click Preview.
- To save your comment, click Post.
If there's already at least one comment, and you'd like to comment on the comment rather than the blog entry, click Reply to This. (This option isn't visible unless at least one comment has already been posted.)
Creating a Blog
If your Tiki administrator has granted the appropriate permissions to users, you can create one or more blogs.
To create a blog, follow these steps:
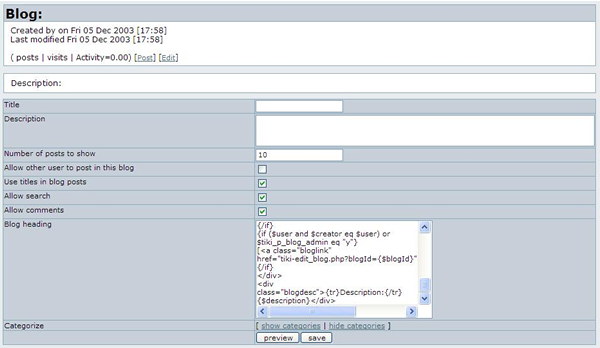
- Under Blog in the Menu, click Create Blog. You'll see the Edit Blog page, shown in the following illustration.
- Choose the configuration options you want (see "Blog Configuration Options," below).
- Click Save.
Blog Configuration Options
You can configure the following settings when you create your blog:
- Title The title of your blog. Since this title must fit in horizontally formatted blog lists, keep it short!
- Description A description of your blog's contents. Like the title, the description must fit in horizontally formatted blog lists, so keep it short.
- Number of posts to show (Default: 10)
- Allow other user to post in this blog If you leave this option unchecked, you're the only user who can post in the blog. Depending on how your administrator has set up blog-related permissions, some or all users will still be able to read your blog (Default: No).
- Use titles in blog posts Leave this option unchecked to title each entry with its creation date alone. This is a good choice for a diary (Default: Yes).
- Allow search Check this option to allow readers to search the full text of your blog entries.
- Allow comments Check this option to allow readers to comment on your blog entries. Just who can comment depends on how your Tiki administrator has defined commenting permissions; in most configurations, only registered users can comment(Default: Yes).
- Blog heading This box shows the code used to generate the blog heading, which appears at the top of your blog. You don't need to modify this text in order to create a blog. For more information, see "The Blog Header," below.
- Categorize If you have created categories and would like to categorize the blog, click Show Categories. Select a category (use Ctrl + Left Click to select more than one category). Be sure to check Categorize this Object.
The Blog Header
If you don't like the way the blog headers look, and you're reasonably knowledgeable about HTML and Smarty code, you can edit the code that's used to generate the header. Here's how the default code looks:
<div class="blogtitle">{tr}Blog{/tr}: {$title}</div>
<div class="bloginfo">
{tr}Created by{/tr} {$creator}{tr} on {/tr}{$created|tiki_short_datetime}<br/>
{tr}Last modified{/tr} {$lastModif|tiki_short_datetime}<br/><br/>
({$posts} {tr}posts{/tr} | {$hits} {tr}visits{/tr} | {tr}Activity={/tr}{$activity|string_format:"%.2f"})
{if $tiki_p_blog_post eq "y"}
{if ($user and $creator eq $user) or $tiki_p_blog_admin eq "y" or $public eq "y"}
[<a class="bloglink" href="tiki-blog_post.php?blogId={$blogId}">{tr}Post{/tr}</a>]
{/if}
{if $rss_blog eq "y"}
[<a class="bloglink" href="tiki-blog_rss.php?blogId={$blogId}">RSS</a>]
{/if}
{/if}
{if ($user and $creator eq $user) or $tiki_p_blog_admin eq "y"}
[<a class="bloglink" href="tiki-edit_blog.php?blogId={$blogId}">{tr}Edit{/tr}</a>]
{/if}
</div>
<div class="blogdesc">{tr}Description:{/tr} {$description}</div>
Posting an Entry to Your Blog
When you post an entry to your blog, you can choose from all of the rich formatting options that Tiki makes available:
- Wiki tags In blog posts, you can use the same formatting tags that you use in a Wiki page.
- WYSIYWG editor You can choose the WYSIWYG editor option for creating your entry. Unlike t__he default (textarea) editor, this editor enables you format text by selecting it and then clicking a format icon.
- HTML In keeping with weblog tradition, HTML is enabled (by default) for blog posts.
To post an entry to your blog, do the following:
- Display your blog.
- Click Post. You'll see the Edit Post page, shown in the following illustration.
- If you would like to use the WYSIWYG editor, click Use WYSIWYG Editor.
- In the Title box, type a brief, descriptive title.
- In the Body box, type the complete text of your post.
- If your post has more than one or two paragraphs, you should probably write a shorter version in the Excerpt box. This excerpt will be displayed on the blog's home page, and it will point to the full text that you enter in Body.
- Do one of the following:
- Click Preview to see how your post will look.
- Click Save to save your post but keep the editing area on-screen.
- Click Save and Exit to save your post and return to your blog.
- Note: To save a draft of the post without making it public, just check the Private checkbox before saving. Once the post is ready for publication, edit it and save it with that option unchecked. A private post is visible by those allowed to post in its blog.

Posting Options
Here's an overview of the options you can choose when you create a blog post.
- Blog If you have permission to post to more than one blog, make sure you choose the correct blog here.
- Smileys To include a smiley in your post, click one of the icons. The smiley code appears at the end of your post; move it to where you want the smiley to appear.
- Quicklinks To see how to format your text using Wiki tags, click one of the Quicklinks. The Quicklink code appears at the end of your post.
- Title Type a short but descriptive title (required).
- Data Type the text of the post here.
- Send trackback pings to:(comma separated list of URIs) Type the URIs of one or more sites to which you want to send trackback pings. (For more information on trackback pings, see Blog.
- Spellcheck Check this option to check your spelling after you save your post. Note: This option will not work unless your Tiki administrator has enabled spell checking.
Editing Your Post
To edit an entry you have already saved,
- Display your blog.
- Click the Edit icon on the post you want to change. You'll see the Edit Post page.
- Make the changes.
- Do one of the following:
- Click Preview to see how your post will look.
- Click Save to save your post but keep the editing area on-screen.
- Click Save and Exit to save your post and return to your blog.
From Here
Are you a Tiki administrator? Learn how to administer Tiki's blog functions in Blog Config.
Curious to see what's under the hood? See Blog Ref for the details.