Wiki-Syntax Images
This is a tutorial, in which you'll learn how to display images on Wiki pages, and within articles, forums and blogs.
Image formats
Tiki is compatible with the following image formats: .BMP, .JPG, .GIF, .PNG
Displaying an Image
Any image in one of the above formats can be displayed on a wiki page through the use of PluginImg (these instructions refer to wiki pages, but they also work for articles and blogs). When editing a page, click on the ![]() icon in the toolbar to bring up a popup form to easily enter the parameters for PluginImg.
icon in the toolbar to bring up a popup form to easily enter the parameters for PluginImg.
This plugin allows you to display images from your tiki site and other sites, to align them on the page, resize them, make them into hyperlinks or thumbnails, add styling like borders, padding, margins, show descriptions and titles, and add shadowbox and mouseover effects, among other things. Go to PluginImg for documentation that explains how to implement these features.
Responsive image
To display the image responsive, which means that the size of the image automatically shrinks and expands depending on the viewport of your display, e.g. the display width, from Tiki14 you simply need to add the class "img-responsive" to the PluginImg.
example:
{img fileId=1 class=img-responsive}
Uploading images to the tiki site
To display an image on a page, it must be uploaded to a web site, either the internal site (the same tiki site where you are wanting to display the image), or to an external site. For images that already exist on a site, on the one hand you can use the URL or the "path". On the other hand, you can use one of several IDs (for internal images), such as the attachment ID or file ID in a file gallery.
The "path" is the end of the URL, after the domain name and the Tiki root directory. For instance, if your Tiki server is example.com and the Tiki root directory is mytiki, then your URL could be https://example.com/mytiki/foo/bar/baz. In this case, the path would be foo/bar/baz. You can also regard the "path" as a relative URL, relative to https://example.com/mytiki.
Use the Img plugin to display images. If you want to use the URL or the path, set the "src" parameter. If you want to use an id (such as "attId" for attached images or "fileId" for images from a file gallery), set the respective Id. The "src" parameter is not being used, in this case. And the "type" parameter is optional.
There are four ways to upload an image to a tiki site as follows. The paths used to identify the image in a plugin and the permissions a user will need or the feature that needs to be enabled are also noted. Notice, that image galleries have been deprecated for a long time and are no longer supported in Tiki 23+. Use file galleries instead.
| Upload Method | Path | Upload Permission/Feature Required |
|---|---|---|
| File Gallery for Images | tiki-download_file.php?fileId=xx | tiki_p_upload_files |
| Image Gallery | show_image.php?id=xx | tiki_p_upload_images |
| "Upload picture" option available when editing a page | img/wiki_up/filename | tiki_p_upload_picture (if admin is not using file galleries to store pictures) |
| Attaching the image to a page | tiki-download_wiki_attachment.php?attId=xx | feature_wiki_attachments needs to be enabled by admin at Admin Home -> Wiki -> Features |
An admin can change permissions by going to tiki-admingroups.php and clicking on the Permissions icon for the relevant group and enabling the permission.
Here's more information about each of these methods:
File Gallery
As the documentation at File Gallery for Images explains, you can upload images to a file gallery either by going directly to a file gallery and uploading it, or through the "Upload Picture" option on the edit panel of a wiki page if the admin has set tiki to use file galleries to store pictures.
Once the image has been uploaded to file galleries, you can use either the (possibly relative) URL or file gallery ID (fileId) number to use in PluginImg or use the image chooser available in the edit toolbar (it's the ![]() icon) to choose an image from a file gallery to display.
icon) to choose an image from a file gallery to display.
Moving img from wiki_up to file gallery
See Wiki Features.
Upload Picture to Image Gallery
Image galleries are no longer supported in Tiki 23+. Use file galleries instead.
Here's how to display an image on a page by uploading it to an image gallery and then linking to the image:
- Upload the image to an image gallery following the instructions at Image Gallery User
- Within the gallery, view the details of the image just uploaded. Underneath the image will be instructions on how to link to it, like this:
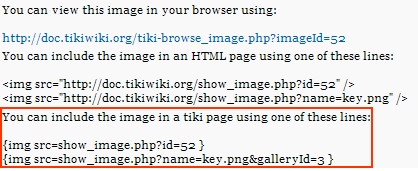
Note the instructions in the red rectangle describing how to link within a tiki page. Beginning with Tiki4 the ID number can be used by itself as follows:
{img id=52}
Upload Picture to a Directory
The "Upload Picture" option available when editing a page can be set by the admin to either upload images to file galleries (discussed above) or to a directory. To upload to a directory, the admin needs to deselect the "Use File Galleries to store pictures" option in the Editing and Plugins configuration panel (at Admin Home -> Editing and Plugins -> General Setings tab -> Features section).
If these settings are in place, the "Upload picture" option will show in the edit panel as follows:

Now follow these instructions to upload a picture:
- Edit: while editing the page, place the cursor at the point where you want the picture inserted.
- Upload: scroll down in the edit window to where it says "Upload Picture" (under the "Tools" tab in Tiki4)
- click the browse button and locate the file on your computer. After you have selected the image and clicked open the file location should be displayed in the Upload picture field
- Images will upload to the directory img/wiki_up/
- Preview: click the preview button and tikiwiki will upload the picture and place it on the page.
Attaching an Image to a Page
For any page that you have permission to attach files to, you will see a button at the top or bottom of the page for attaching files. Click this button, browse for the image and upload it. Once uploaded, you can use the path to the attachment, as mentioned above, or ID number in PluginImg to display the image on a page.
Linking to an Image on Another Site
If the feature 'Cache external images' is set in the Admin Home -> General panel, when a URL is used, Tiki will automatically capture the image and store it in the database and update the link so that it points to that image. This allows images to be maintained on the pages even if they are removed from the remote servers that originally had them. See Cache External Images for more information.
Clearing Text Wrapping
In some situations the text wrapping around an image needs to be interrupted, such as when an image would otherwise intrude into an unrelated section. Beginning with Tiki4, the block parameter in PluginImg can be used to help with this. Otherwise, the following methods can be used:
- The text and image can be wrapped with {DIV(class="clearfix")}...{DIV}
- Within the {img} options include class=clearfix to end the wrapping.
- If the feature Dynamic Variable is enabled, use %clear% and define that variable as having:
Copy to clipboard<BR style="clear: both" />
 The Dynamic Content feature can be used with a similar BR tag definition within a content block.
Links to Image-Related TikiWiki Directories
This table shows where image files are located on a Tiki site. It gives the directory, a brief description of the files (in some cases), the number of files in that directory (as of Tiki4) and (in some cases) a link to a page where many of the images can be viewed:
| Directory | Description | Qty | Link |
|---|---|---|---|
images |
Most of the icons used in Tiki | 80 |
Directory Images Files |
img |
Backgrounds & logos | 24 |
Directory Img Files |
img/avatars |
User avatars | 580 |
Directory Img-Avatars Files |
img/custom |
Images for articles, blogs, files, etc. | 27 |
Directory Img-Custom Files |
img/flags |
Flags from everywhere | 249 |
Directory Img-Flags Files |
img/graph |
Graphs | 4 |
|
img/icn |
Icons for file types | 34 |
Directory Img-Icn Files |
img/icons |
A variety of small icons | 309 |
Directory Img-Icons Files |
img/icons2 |
More small icons | 164 |
Directory Img-Icons2 Files |
img/mytiki |
Icons used in My-Tiki | 16 |
Directory Img-MyTiki Files |
img/smiles |
Smilies | 24 |
Directory Img-Smiles Files |
img/tiki |
Tiki icons | 6 |
Directory Img-Tiki Files |
img/webmail |
Icons used in webmail | 14 |
Directory Img-WebMail Files |
img/wiki_up |
Uploaded images | varies |
|
lib/adodb/cute_icons_for_site |
ADOdb Icons | 2 |
Directory Lib-Adodb Files |
lib/fckeditor/various |
FCKeditor Icons | 222 |
|
lib/hawhaw/skin/magnify |
1 |
||
lib/htmlparser |
1 |
||
lib/images/icons |
76 |
||
lib/jquery/various |
350 |
||
lib/jscalendar/various |
13 |
||
lib/phplayers/various |
162 |
||
lib/slideshow |
18 |
||
lib/slideshow_tiki |
2 |
||
lib/smarty/misc |
1 |
||
lib/tikihelp/icons |
19 |
||
img/various |
390 |
||
styles/various |
59 |
||
themes/various |
??? |