인터티키
- 개요
- 인터티키 기능은 다른 티키들로 하여금 상호간 사용자 데이터를 소통할 수 있도록 합니다.
- 접근하려면
- 관리패널 에서 인터티키 아이콘
 를 클릭합니다
혹은
http://yourdomain.com/tiki-admin.php?page=intertiki 로 접속합니다.
- 탭
- 본 페이지는 다음과 같은 탭을 포함합니다:
- 주의
- ''아래의 정보는 인터티키 기능을 사용과 관리와 연관되어 있습니다. 추후에는 새 사용자 및 관리 설명서로 이동될 것입니다."
소개
인터티키 기능은 티키들 간 사용자 데이터를 서로 커뮤니케이트 하도록 합니다. 이는 xmlrpc 프로토콜에 기반을 두고 있습니다 (그러므로, 귀하의 티키에서 xmlrpc 기능이 활성화 할 필요가 있습니다, 이는 티키 위키 기능 제어판에서 설정할 수 있습니다). 만약 그러한 응용프로그램들이 XMLRPC를 통하여 커뮤니케이트를 할 수 있다면, 여러 개의 응용프로그램으로 확장될 수 있습니다. Tiki 브랜치 1.9 에서 모든 tikiwiki.org 서브도메인의 내부의 교차 사이트 인증을 허용하기 위하여 소개되었습니다.
가정:
- 클라이언트 IP 가 이 기능이 작동하도록 고정설정 되어있어야만 합니다
- 티키 3.0 부터는, 인터티키 마스터가 아파치 승인 barrier 뒤에서 존재하면 안됩니다. (htpasswd)
- 티키 3.0 부터는, 인터니키 마스터는 웹 승인 방식을 사용해서는 안됩니다.
주요 기능 및 하부 기능들
인터티키의 주 설계는 여러 개의 티키 사이트들 간의 마스터-슬레이브 승인 관계를 달성하고자 하는 의도를 가지고 있습니다. 사용자 데이터에 대하여 한 개의 중앙 소스에 대비하여 여러 개의 위성 사이트를 하용하도록 설계 되어 있습니다.
부가적으로 인터티키는 주 사용자 원천과 그들의 상응하는 그룹으로부터 사용자 프로파일을 전송하도록 사용 될 수 있습니다. 이러한 선택은 설정이 가능하고 다양한 범위의 인증과 사용자 데이터 공유 패러다임을 허용합니다.
인터티키는 티키 내부의 사용자 데이터의 거의 모든 자원에 대하여 질의를 할 수 있는 XMLRPC의 능력을 활용하여 부가적 사용자 지정 개발과 함께 여러 개의 다른 목적 용도로 확장될 수 있습니다.
구성 예제
적절한 구상에 대하여 인터티키를 활성화하기 위하여, 4개의 단계가 요구됩니다:
- 마스터와 슬레이브(들) 두군데 모두에서 티키위키 기능 제어 내부에서 "인터티키"를 활성화합니다
- 마스터와 슬레이브(들) 두군데 모두에서 티키위키 기능 제어 내부에서 "XMLRPC"를 활성화합니다
- "클라이언트" 티키 (마스터에게 인증을 요청하게 될 티키)에서 로그인 기능 페이지 내부의 "인증 방식"을 "웹 서버"로 변경합니다.
- 아래의 예제 정보에 기반하여 귀하의 배치된 내역에 따라 필요하다면 변경을 가하여 서버와 클라이언트(들)를 구성합니다.
필드의 설명
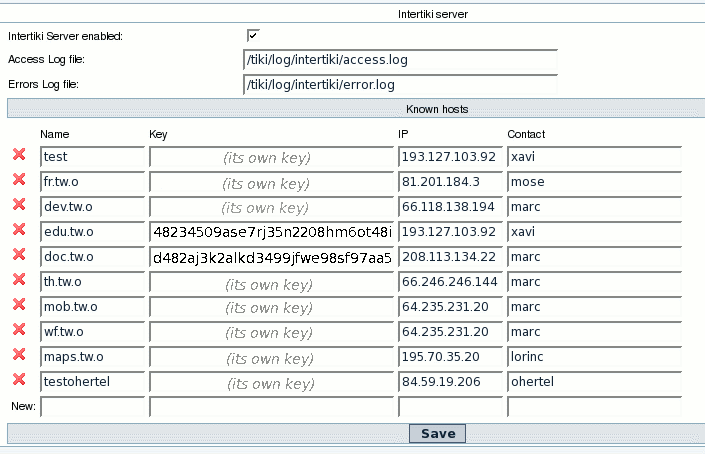
서버 설정
다음 목록은 주 인증 서버 (다른 티키에서 사용자 데이터를 요청이 들어오는 마스터) 가 되도록 구성을 할 기계의 인터티키 기능 페이지에서 연관 필드들입니다:
- 인터티키 서버 활성화됨: 이 기계를 인터티키 서버로 만드려면 이를 체크하십시오
- 동일한 도메인 하에서 sliding auth에 대하여 인터티키 공유 쿠키: 활성화되면, 그 어떤 사이트 (슬레이브 혹은 마스터 여부와 상관없이) 로그인 혹은 로그 아웃하는 사용자는 자동적으로 다른 모든 사이트에서 로그인 혹은 아웃됩니다. (기억하기 (rememberme) 기능이 켜져 있어야 함)
- 로그 파일 접근: 접근 로그 파일이 저장할 위치, 티키의 루트 디렉터리에서 시작됨
- 편집자 노트: 여기에 몇몇 예제를 포함하는 것이 좋을 듯. 이 경로는 "/" 로 시작하는지 확인 필요. 이것이 URL인지 혹은 서버의 루트로부터 파일로의 직접 경로인지 확인 필요?
- 오류 로그 파일: 오류 파일일 저장할 위치. 티키으 루트 디렉터리에서 시작
다음의 표는 다중 클라이언트를 저장할 수 있도록 합니다. 이 목록의 클라이언트들만이 서버에 대하여 요청을 할 수 있도록 허용됩니다. 이는 유용하며, 필수적인 보안 기능입니다:
- 이름: 이 구성설정을 독특하게 분별하기 위한 임의의 이름 (동작에는 영향을 미치지 않습니다). 클라이언트 서버를 나타내는 이름을 상요할 것을 권합니다. (예: doc.tw.o)
- 키: 이는 귀하가 정의하는 공유 키 입니다. 이는 서버의 클라이언트 구성과 일치해야 합니다. 이것의 길이는 원하는 대로 길거나 짧을 수 있습니다. 무선 WEP 키에 적용되는 것과 유사한 조직의 규칙과 동일한 것을 따르도록 권장하는 바입니다.
- IP: 서버로 요청을 보내게 될 클라이언트 기계의 물리적 IP 주소. 클라이언트가 동일한 기계에 있다면, 127.0.0.1 을 사용할 수도 있을 것입니다
- __연락처: 클라이언트 기계의 주 연락처. 관리에 용이함
클라이언트 설정
중요: 귀하의 클라이언트 기계에 (마스터 서버에 인증을 요청하게 되는 기계) 로그인 관리 제어 페이지에 "웹서버"로 인증 유형을 반드시 설정해야만 합니다. 그렇지 않으면 인터티키는 작동하지 않을 것입니다.
티키 3.0에서는, 인터티키 서버 필드를 먼저 입력하며 시작하는 것이 유용합니다.
인터티키 서버 필드는 이 클라이언트에서 접근을 원하는 모든 마스터 서버에대하여 정의를 하기 위함입니다
- 이름: 마스터의 서버명 필드에 정외된 대로의 목표 서버명을 설정하십시오. 구분하기 쉽지만 이해하기도 쉬운 값을 사용하십시오.
- 호스트: 마스터 서버의 주 티키의 전체 URL (예: http://www.tikiwiki.org).
- 주의, 귀하의 티키가 웹 디렉터리의 상단 레벨에 있지않더라도, 위의 예제와 관련하여 귀하의 사이트의 URL을 계속 사용할 것입니다..
- 포트: 마스터 티키가 HTTP 에 반응하는 포트 번호 (일반적으로 80)
- 주의: 티키 3.0부터, HTTP가 XML_RPC 상호교환에 대하여 가정되는 사용 방식이다.
- 경로: 서버 상에서 XMLRPC 핸들러를 포함하는 PHP 파일로의 (url 루트로 부터의) 전체 경로
- 예제 1: 마스터 티키가 사이트의 루트에 놓여있는 경우, "/remote.php" 를 입력합니다
- 예제 2: 마스터 티키가 http://www.mydomain.com/tiki/mytiki 에서 발견되는 경우라면, 이 필드에 "/tiki/mytiki/remote.php" 를 입력합니다.
- 그룹: 인증의 대상이 되는 마스트 상의 그룹들 (정의된 그룹 안의 auth 사용자들만 해당, 대소문자 구분).
- 이 것은 필수조건인가 아니면 비어진 채로 둘 수 있는가?
저장을 클릭하고 인터티키 클라이언트의 설치 화면의 상단부로 이동하십시오
- Tiki Unique Key: This must match the shared key entered in the Master's key field.
- xxxxx As Master: Use the drop down list to select the master server you just setup.
- Import User Preferences: Check this box if you want your client Tiki to copy the user preferences from the master server (NOTE: This will overwrite local user preferences every time the user logs in)
- Import User Groups: Check this box if you want the groups the user belongs to on the master server to be imported (along with their security defintions). NOTE: This will overwrite local groups every time a user logs in.
- Limit Group Import: A comma separated list of case-sensitive group names. This list will limit the group import feature to only those groups listed here.
- Intertiki shared cookie for sliding auth under same domain: When enabled a user who logs into or out of any site(slaves or master) is automatically logged into or out of all other sites. (feature rememberme must be on).
그림으로 보는 예제
아래에서 2개의 tikiwiki.org 를 상대로 인터티키를 사용하는 티키 클라이언트의 (doc.tikiwiki.org, edu.tikiwiki.org]) 구성의 예를 볼 수 있습니다.
Intertiki client 1: doc.tikiwiki.org
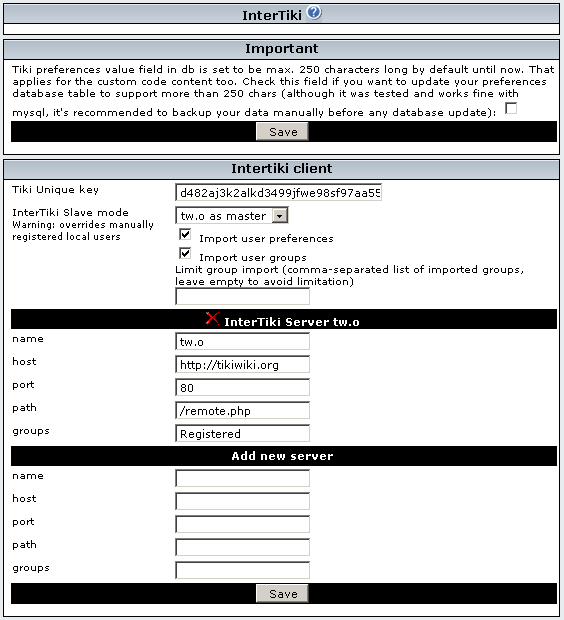
Intertiki client 2: edu.tikiwiki.org
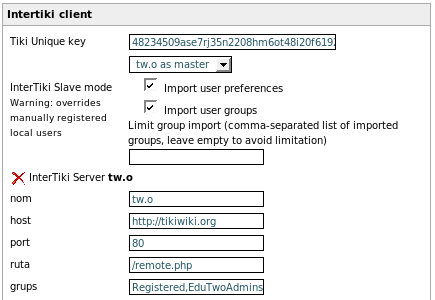
Intertiki Server: tikiwiki.org
Hosting example
Please find below an example of successful setup at a hosting environment (siteground)
gezzaz notes:
- the setup below is not so much different than above but I was struggling a while to get it right, so I decided to share it. I was stuck with error message saying that the key is not valid but it was entered correctly >> I think I got this error because changing the key on the master side is not performed correctly. You will get the above error if you decide to change your key on the master and make a save. So you have to delete the whole config row on the master and enter the values again if you wish to make changes. On the client side you can change the key without removing the old entry, it got updated for me
- Please interpret mydomain.com to your domain name
Starting ground:
| |||||||||||||||||||||||||||||||||||||||||
|
| ||||||||||||||||||||||||||||||||||||||||
Intertiki internal details
Get version : intertiki:get_version
Used for debugging at this time. Future plans include the ability to limit requests based on a minimally defined TikiWiki version.
Remote login : intertiki.validate
This enables the ability to use a tiki account created on one tiki, at another tiki. One tiki is server, the other is client (client will authenticate against the server). The server has to identify a url where the xmlrpc requests can be reached. The client uses that url to reach server and send xmlrpc requests. (Typically this is: http://yourtiki/remote.php, as the XMLRPC server handler code is located in the remote.php file in your tiki root directory).
The idea is to avoid creating a local account such remote logins. At this time, a local account is automatically created on the client Tiki when a client succesfully authenticates against an Intertiki master server if that account does not already exist. Intertiki clients support the use of the @ as a delimiter for specifying the 'realm' the login belongs to when a user is logging in. This feature is primarily useful if a client Tiki can authenticate against more than one master tiki allowing for complex Intertiki relationships between Tiki sites. Some changes are made here and there to avoid a new client login containing a @ access certain features (like preferences and such).
Upon successful login from a remote intertiki server, the client will log the user into the local client Tiki. If the options are chosen it will also transfer the users preferences and group security settings from the master Interiki server.
Each validation request also sends a hash key that sort of identifies the client server. Eventually the use of that key will be optional. However a good security practice will be to keep it in place, especially if your Tiki is publicly available on the web.
Future enhancements
In the login box a new menu is proposed with that when enabled via login features will list the possible master auth locations, either local or remote. The user could also type login@remote directly it will be processed correctly.
Trouble shooting
- check the IP is the right one by checking the tiki Logs
- check that the error log and the access log are writeable by the server
- if your client does not have a static IP and you need to specify an IP range in the server settings check out a temp fix here: http://dev.tikiwiki.org/tiki-view_tracker_item.php?itemId=1878
- http://www.xmlrpc.com/
- http://phpxmlrpc.sourceforge.net/ (on which is based the xmlrpc pear lib used in tiki)
- http://tikiwiki.org/InterTiki
- TRIM to manage many TikiWikis!