The Tiki Category feature allows to manage and classify content being created on the fly, by different groups with different access permissions, and make navigation and indexing much easier.
Categories Admin
Category can be used together with groups to hide objects/pages from specific groups of users, creating "private" areas that may even look different from the rest of the site.
Are categories the right tool for you? See: How to organize your content
To access: Click the Categories icon on the Admin Panel
or Access http://example.org/tiki-admin.php?page=categories
Creating categories and sub-categories
You can reach administration of categories through "Admin -> Categories" at the main menu.
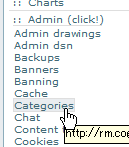
Then, you can add a new category at top level (for instance: "Status").

Note that you have "Assign permissions automatically: (recommended for best performance)". Leave it toggled on, for the time being, if you are not sure.
If you click on a pre-existent category (for instance, in the newly created Status category), you'll be ready to add subcategories to it.
You should see the path to the category you are in, like "Current Category: Top :: Status", in this case:

Then, you can add a new category (for instance: "1. To Do"), as a child of the parent category ("Status") selected.

Once created, if you click on the the ">>>" at the right of "Status" category, you could see the child categories below:

After some work, you could have something like:

Creating categories in batch from CSV files
Tiki 3 - How to Create Categories In Batch by Uploading a CSV File.pdf
Tiki 3 - How to Create Categories In Batch by Uploading a CSV File.doc
Step 1 : Create A CSV File that Describes Your Categories
Step 2 : Navigate to [[http://<server-name>/tiki/tiki-admin_categories.php]]
and use the Batch upload panel to select your Category CSV file and upload it
to your Tiki [[replace <server-name> with the name of your server, such as "localhost"]]
Step 3 : Verify that your new categories have been created
But imagine that you would like that all content is readable only by registered users of your site, and only the content categorized as "7.Validated" is readable by anonymous. You could achieve that using category permissions (see following section).
Assigning permissions to categories
How Category Permissions Work
The category permission system follows the following rules.
- Categories are treated as objects, just like wiki pages and forums, etc.
- Category perms are hierarchical, unless you override the "& all children" option. Child objects will automatically inherit permissions from their parents.
- If there is a conflict between child and parent perms, permissions assigned to child objects take precedence over permissions assigned to parent objects.
- If a category allows (or does not disallow) user access to an object, the user's Groups permissions must also allow access to that kind of object.
- If no permissions are assigned to an object and any of its ancestor objects, global permissions for that users Groups are applied.
- Objects can be placed in more than one category.
- Multiple category permissions: In the case where an object belongs to more than one category, the user must have permissions in all of the applied categories to perform that action. In other words, the category where the user had the lowest permissions takes precedence when considering if user can perform the action or not.
- The stricter "must perms in all" rule can be relaxed (in tiki 1.10) to a "must have perms in one" by unchecking "Permission to all (not just any) of an object's categories is required for access" in admin->categories.
To assign permissions to a category, go to tiki-admin_categories.php and click the appropriate key icon, which will send you to tiki-categpermissions.php. tiki-categpermissions looks and works very much like tiki-pagepermissions.php.
To know what the permissions mean exactly, see: Categories Details
Changes to Category Perms Between 1.9 and 1.10
Before 1.10 there were only two category permissions:
- tiki_p_admin_categories
- tiki_p_view_categories
using these two perms, could not have a user who could view a categorized page but not edit (if they otherwise had edit permissions).
Starting in version 1.10, the permissions related to categories have been modified, to allow the possibility for users who can add an object to a category, but not change or remove the assigned categorization of an object.
As such Tiki 1.10.x has different meaning for tiki_p_view_categories, and introduced some new perms like tiki_p_view_categorized. More information in Categories DetailsExample
Following with the example in Categories Admin, we need to click on the green key (![]() ) icon at the left of "Status" category:
) icon at the left of "Status" category:

which could show as something like:
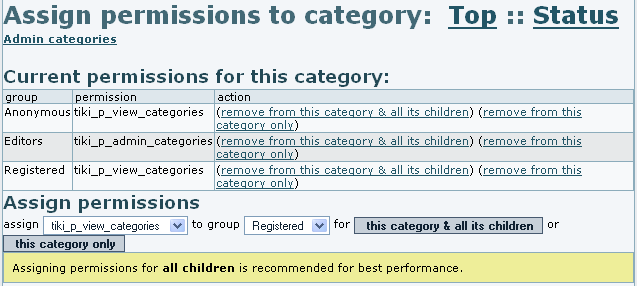
As stated in the cited example, we want to remove from the anonymous group the permission to view the category content from all the "Status" subcategories. The easiest way is to click on "(remove from this category & all its children)":
| group | permission | action |
| Anonymous | tiki_p_view_categories | (remove from this category & all its children) (remove from this category only) |
| (...) | ||
You might need to confirm the action, depending on your configuration, to end up with a table like this:

Then, you can go back to "Admin categories", click on the ">>>" sign at the right of Status category, and click on the green key (![]() ) at the left of 7. validated (see image above, if needed). There we can add the permission tiki_p_view_categories for the anonymous group to read the content from that category, through clicking on "this category only" (or add the permission to that category and its children using the other button, if we had some child categories inside, and we would wish to do so).
) at the left of 7. validated (see image above, if needed). There we can add the permission tiki_p_view_categories for the anonymous group to read the content from that category, through clicking on "this category only" (or add the permission to that category and its children using the other button, if we had some child categories inside, and we would wish to do so).
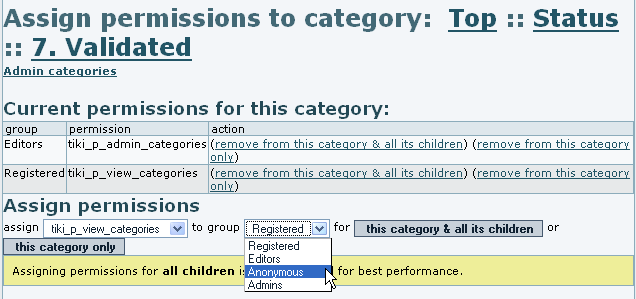
That's it. 😊
Note that if there is no permission assigned to a category, you will see the yellow key (![]() ) icon next to it.
) icon next to it.
And also that, starting in Tiki 1.10, a new category permission is added to Tiki in order to easily allow granting (or restricting) users to edit contents assigned to a category, through the permission "tiki_p_edit_categories" (= "Can edit items in categories").
Adding content to categories
You can add content to the categories from editing an object itself (see Category User), on a edit an object by object basis, or in a centralized procedure from "Admin -> Categories".
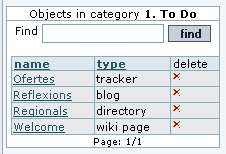
For instance, we can add some content to the category "1. To Do", from the example above. We can click on the category name in the list, and we would see the objects which are already assigned to this category (no one in this example), and add new (existent) objects to this category:
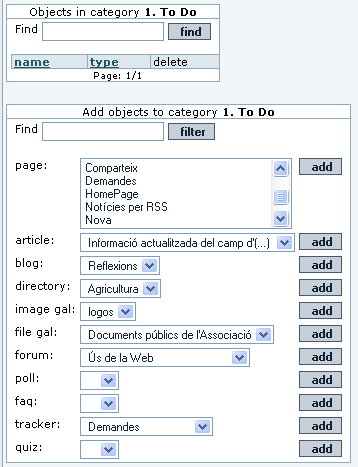
After adding some objects, you will see them listed on the box "Objects in category 1. To Do":
Applying themes to categories.
You can assign a basic theme style for you tiki site, but select some other theme site (such a customized them style similar to the previous but columnless, for instance) for specific objects in your tiki, or for specific categories. This way you might have, for instance, a homepage without columns, and after clicking on some links, keep browsing your site with some column/s on the side/s.
To enable this feature, you need to toggle it on as all the rest of fetures at "Admin -> Features".

The rest of information about how to use this feature can be read at its specific documentation page: Theme Control
Using the current object categories in a tpl
tikiwiki>=3.0
If you want to use the current focus object categories in tiki.tpl for instance (you want to display some special menu in the column or in the header) you can use the feature 'Categories used in tpl' in admin->category
It will set the smarty variable objectCategoryIds
You can after use it like this
{if isset($objectCategoryIds) and in_array(54, $objectCategoryIds)}
     {menu id=50}
{/if}
where 54 is the categoryId you want to display the menu.
The part isset($objectCategoryIds) tests if you actually have activated the feature
The part in_array(54, $objectCategoryIds) tests if the categoryId 54 is in the list of categoriees of the current focus object.
If you are on a page like tiki-index.php?page=foobar and if this page has the category 54 then the menu with menuId=50 will be displayed
General Admin setting
| Show Category Path | Show all the category paths of an object at the top of a page | |
| Show Category Objects | Show the objects sorted by categories and object types that are in the same categories of the object at the bottom of a page | |
| Category used in tpl | If you plan to use the category in the templates, you need to activate this feature. This will slow down you application as all the categories are looked for for the current object | |