Historical overview of Maps integration in Tiki
Later on, Google Maps arrived, providing an easy to use map integration to regular web sites, even without having to manage mapping data. Thus, Google Maps specific code was added to Tiki, which was convenient for a lot of people.
Then, after a community discussion, starting in Tiki7, OpenLayers (another option was Mapstraction) was added as a native way to handle maps, which permits the use of tiles from Google Maps, Bing Maps, OpenStreetMap (which is like Wikipedia but for maps), MapQuest (which serves OpenStreetMap maps), etc.
The Cartograf project further improved maps in Tiki8, Tiki9, Tiki10 and Tiki11. Many features were added, including Street View support.
In Tiki12, all Google Maps specific code was removed in favor of using OpenLayers, so Google Maps is accessible via the OpenLayers Google Layer. In addition the Natural Access project (no longer active) added further new capabilities to upload any existing line and polygon data as files and to be able to further customise how data objects were shown on the underlying map layer.
In Tiki15 all MapServer-specific code has been removed. Also OpenLayers 2.x continues to be used for the map layer and integration with Tiki to allow editable map objects to be overlaid on the map layer but experimentation has started with the integration of OpenLayers 3.x.
In Tiki20 integration with OpenLayers 3.x and higher was improved, and more features were exposed through the corresponding PluginMap parameters, as well as adding new tilesets, some of them using vector tiles instead of just the usual raster tiles.
Map-related documentation, as of summer of 2019, still makes reference to the different historical approaches but as it continues to be improved the older methods that are no longer used will be deprecated/removed. Volunteers to help with documentation improvement : please contact marclaporte at tiki dot org
Mod Gmap
This is a Wiki plugin, distributed as a mod for displaying a Gmap in a wiki page, where each page represents a marker on a global map. The mod creates a geo-coded location of a wiki page, backlinked pages, or pages in a structure. It is currently available only as a mod, which means you have to upload the files to replace the current gmap plugin.
Author: Nelson Ko
License: LGPL
Last Version: 1.0 ( 2007-06-30)
Download: mods.tiki.org or use mods in your tikiwiki to install.
{GMAP(type=>page, width=>400, controller=>none, mode=>normal)/}
- optional parameters are separated by commas
- there are no spaces anywhere, except after commas.
Parameters
| Parameter | Accepted values | Description | Default |
| type | page | maps the current single page | page |
| backlinks | maps the backlinks of the current page | ||
| structure | maps the pages in the structure that the current page is in | ||
| route | maps the pages in the structure that the current page is in and draws a line between points as in a route | ||
| width | number | width in pixels | 500 |
| height | number | height in pixels | 400 |
| controller | large | this contains pan/zoom buttons and clickable zoom scale | large |
| medium | this contains pan/zoom buttons but no clickable zoom scale | ||
| small | this contains zoom buttons only | ||
| none | the controller is disabled | ||
| changetype | y/n | the buttons to change the mode of the map can be disabled | y |
| scale | y/n | the display of the map scale can be disabled | y |
| mode | normal | start the map in normal streetmap mode | normal |
| satellite | start the map in satellite mode | ||
| hybrid | start the map in satellite/streetmap hybrid mode | ||
Notes:
- To use this plugin, you should set the cache time for wiki pages = 0 (no caching), otherwise you may have dificulties editing geolocations (or seeing the edits you have made anyway). Set the wiki cache in Admin>Wiki
- Having multiple google maps on the same page is not recommended as it can cause unpredictable results.
Using this Plugin
Type=Page
The default syntax (above), when saved in a wiki page will produce the following map.
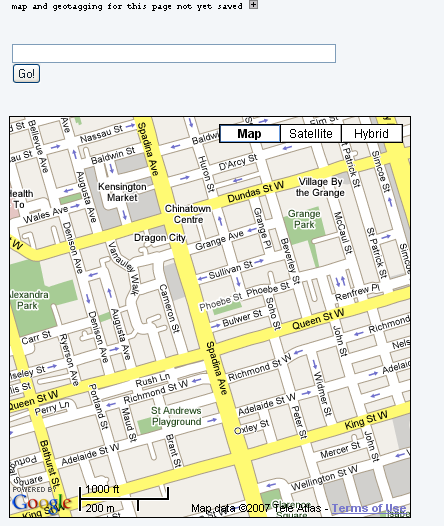
At this point you can:
- click on the + sign to open the location editor.
- type in an address and "GO" to that address.
- single click on the map directly to create a point on the current map.
Using the Location Editor
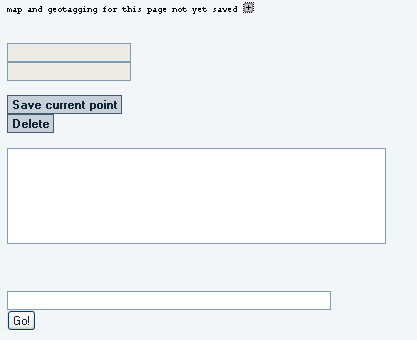
Once you have created a point on the map, you can edit the information that appears in the balloon. The latitude and longitude information is normally not editable. You change the location by clicking on the map or by searching to a new address.
Requirements and additional instructions:

This pluging may be added via the mods admin panel at yourdomain.com/tiki-mods.php
These steps below should be taken care off through the mods deployment process. Otherwise the manual steps required are:

1. This file is to be deployed to <tikiroot>/lib/wiki-plugins/

2. Included gmapwikipluginlib.php should be deployed to <tikiroot>/lib/wiki-plugins/

3. Included gmap_wikiplugin_save.php should be deployed to <tikiroot>/

4. The following included smarty templates should be deployed to <tikiroot>/templates/wiki-plugins/
wikiplugin-backlinkgmap.tpl
wikiplugin-gmap.tpl
wikiplugin-routegmap.tpl
wikiplugin-structuregmap.tpl

5. The following SQL command is to be executed to create the necessary database table:

CREATE TABLE `wikiplugin_gmap` (
	`pageid` int(14) NOT NULL,
	`pref` varchar(40) NOT NULL,
	`value` varchar(250) default NULL,
	PRIMARY KEY  (`pageid`,`pref`)
) TYPE=MyISAM;

6. In order for route type to work and for the google maps polylines to work, the VML namespace
must be specified in the html tag in <tikiroot>/templates/header.tpl, like this:

<html xmlns="http://www.w3.org/1999/xhtml" xmlns:v="urn:schemas-microsoft-com:vml">


7. When using the plugin, click on the "+" icon next to the text at the top to access the geocoding information.
The coordinates are automatically into the fields there through mouse clicks on the map.

8. Note that having multiple google maps on the same page is not recommended as it can cause unpredictable results.