Fonctionnalité Lettres de diffusion
Cette page est en voie de traduction Veuillez revenir plus tard...
The Tiki newsletter feature allows you to send a newsletter via email to a list of subscribers. The email can be sent in HTML format, plain text format, or both. Other newsletter features include:
- user controlled subscribe/unsubscribe
- Admin can restrict subscription to the users email address of record, or allow any address to be used.
- Admin controlled subscribe/unsubscribe
- email address validation
- include unsubscribe instructions in the newsletter
- granular object permissions for viewing, sending, etc
- Groups can be subscribed to newsletters (including embedded groups)
- Since Tiki6 you can now also 'subscribe' a Wiki page so that its contents, whatever it is at the time, can be used to define emails to which an individual Newsletter Edition is sent.
- Since Tiki6, you can automatically send newsletters with a cron/batch job based on some wiki page template with plugins (upcoming events, last posts, new items, ...).
- - - - - - - - - - - - - - - - - - - - - - - - - - - - - - - - - - - - - - - - - - - - - - - - - - - - - - - - - - - - - - - - - - - - - - - - - - - - - - - - - - - - - - - - - - - - - - - - - - - - - - - -
UTILISER les Lettres de diffusion
1.1. Listing newsletters
Clicking the newsletters link in the application menu lists the available newsletters. The user can subscribe to a newsletter by clicking it. If the user has the permission and the newsletter admits it the user can subscribe an email address different than the one he is using on the site, sometimes users with many email accounts want to deliver newsletters to a specific account instead of his main email account.
Once subscribed the user will NOT receive the newsletter until he confirms his subscription. Tiki will send the user email a message asking him to click a link to enable the subscription. This prevents users or admins from spamming users by adding them to the newsletter.
1.2. Sending newsletters
If the admin has granted you permission to send newsletters, you will see an item on your menu like this:
Clicking on Send Newsletters will bring up the newsletter editing page:
The Newsletter Subject Line will appear as the subject of the email that is sent to the subscribers. The Selection Dropdown allows you to choose which newsletter you are going to write and send. The creation screen has both an HTML Edit Area and a Text Edit Area so you can compose both versions of your newsletter at the same time. The HTML Quicktags allow you to quickly add HTML elements without a thorough knowledge of HTML.
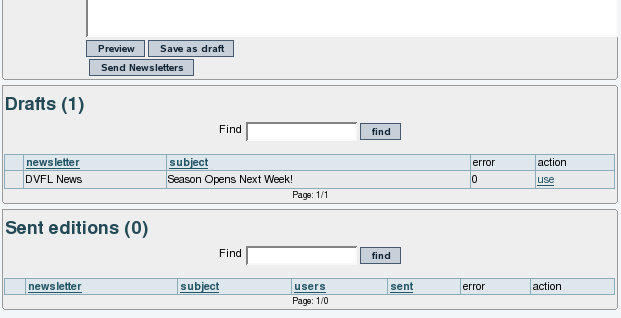
When you have finished composing your newsletter, you'll want to use the buttons at the bottom of the editing page.
Preview will show you how your newsletter will appear in both HTML and text format. You can use the Save As Draft button to save the newsletter in its current form. If you want to retrieve the draft later and continue editing, you can click the use link on the far right of the Draft list. If you're completely satisfied with the preview, you can click the Send Newsletters button to push the newsletter out to your subscribers.
1.3. Subscribing and unsubscribing
The emails that tiki send to newsletter users to confirm a subscription, welcome a user or say bye bye are in the directory templates/mails, you can edit them as you want.
Once a subscription is confirmed the user will be able to unsubscribe by following a link that is automatically sent when a newsletter is sent to the user.
Since Tiki6 you can add emails to a Newsletter from a list of emails in a Wiki page, so that the contents of that wiki page, whatever they are at the time, can be used to define emails to which an individual Newsletter Edition is sent. That list can be manually edited (one email per line) or it can be dynamically fetched from a tracker dataset, through the PluginTrackerList and using Pretty Trackers. See more information in Newsletter Admin
1.4. Content templates for newsletters
Since Tiki4 you can use Content templates to send newsletters. You seem to need to enable CMS (Articles), Wiki, plus "content templates" on both features in order to have the menu item under "Admin > Content templates" (tiki-admin_content_templates.php).
Then, once enabled, you'll have a drop down at newsletter definition to populate the newsletter content based on the template.
That template can be based on the text area content added through tiki-admin_content_templates.php, or it can be added through adding the name of the wiki page which has the content that you want to use as template. At least, this is the behavior in Tiki5.
Using content templates you should be able to use pretty tracker templates for sending customized newsletter messages, through the usage of plugins in wiki pages. For instance, you could get the content of a trackerlist plugin, from a pretty tracker template layout, with the last items added to a tracker within a certain time frame. Use case: A Barter network, where users would like to receive in their email information about the new offers and demands added to the network in the last month.
1.5. Sending newsletters with a cron/batch job
Introduced in Tiki6.0
As you can create a newsletter edition with modules and wiki plugins, you could wnat to resend this newsletter edition on regular basis. For this you can you a cron job that calls
Copy to clipboard tiki-bach_send_newsletter.php 10
Please replace 10 with the editionId of the newsletter edition you want to resend.
The task outputs the list of emails the newsletter was sent to and the link to the log. If you configure the cron job correctly, this output can be sent to an email.
Tips: to activate a cron job see Batch
- - - - - - - - - - - - - - - - - - - - - - - - - - - - - - - - - - - - - - - - - - - - - - - - - - - - - - - - - - - - - - - - - - - - - - - - - - - - - - - - - - - - - - - - - - - - - - - - - - - - - - - -
ADMINISTRER les Lettres de diffusion
1.1. Enabling the Newsletter Feature
Logged in as Admin, select Admin Home, and click on Features
Select the Newsletters checkbox and click on the Change Preferences button at the bottom of the page. You should now see Newsletters as an item on your Application Menu, like this:
1.2. Creating newsletters
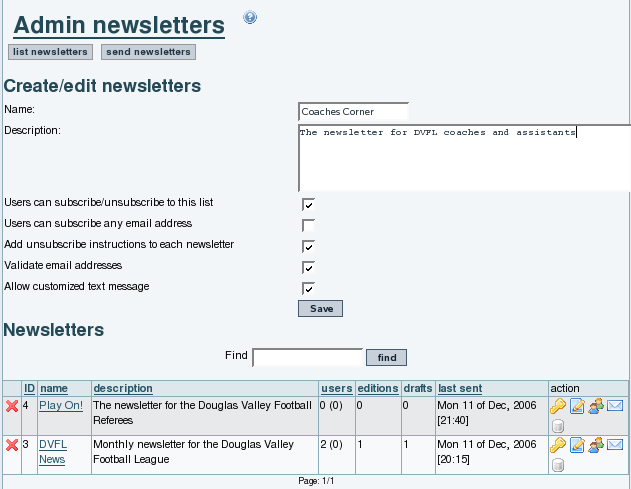
You can create a newsletter from clicking the Admin Newsletters link in the newsletters section of the application menu. This opens the Admin Newsletters screen. Here's a view of that screen:
The options below the Newsletter name and description control how the newsletter is distributed.
Checkbox | Effect
| Users can subscribe/unsubscribe to this list | If this box is checked,users can subscribe and unsubscribe withour admin intervention. If it's not checked, the admin controls the subscriptions to this list.
| Users can subscribe any email address | If this box is checked, the user can use any email address for their subscription. If it's not checked, the user must use the address from their Tiki user record
| Add unsubscribe instructions to each newsletter | If this box is checked, a block of text with instructions on unsubscribing is included in each newsletter
| Validate email addresses | If this box is checked, an email will be sent to each new subscriber containing a special link that must be clicked to complete the subscription
| Allow customized text message | If this is checked, you will be able to add a custom block of code that appears in each newsletter. This can be used for marketing messages or other boilerplate text. |
1.3. Changing Existing Newsletters
The area below the creation section shows a list of newsletters already created. The icons on the far right allow you to change each newsletter's settings:
| Change newsletter permissions
|
| Edit Newsletter Information
|
| Subscriptions
|
| Send Newsletter
| (insert icon here) | Newsletter Archive |
The screenshot above needs the archive icon added.
You can define templates for newsletters using the content templates system and then selecting the template from the send newsletters screen.
The From name is defined by the field "Sender Email" in the admin panel.
1.4. Add emails to a newsletter from a list in a wiki page
You can now add emails to a Newsletter from a list of emails in a Wiki page, so that the contents of that wiki page, whatever they are at the time, can be used to define emails to which an individual Newsletter Edition is sent.
That list can be manually edited (one email per line) or it can be dynamically fetched from a tracker dataset, through the PluginTrackerList and using Pretty Trackers.
Example:
Page: Recipients
Copy to clipboard {trackerlist trackerId="2" fields="32:33:34" filterfield="32" filtervalue ="%" wiki="recipients_template tpl"}
Page: recipients tpl
Copy to clipboard {$f_33} {$f_34} <{$f_32}>,
Then add Recipients as the "Import emails from wiki page" on tiki-admin_newsletter_subscriptions.php to add them now, or "Use emails from wiki page" to add the contents of the page at newsletter sending time.
- - - - - - - - - - - - - - - - - - - - - - - - - - - - - - - - - - - - - - - - - - - - - - - - - - - - - - - - - - - - - - - - - - - - - - - - - - - - - - - - - - - - - - - - - - - - - - - - - - - - - - - -
Coupure d’article de presse
This is a new feature in Tiki6 for clipping of article titles or headings to a newsletter automatically, to be emailed out.
Essentially in Tiki 6, go to admin newsletters and check the checkbox to enable clipping for the newsletter you want, and then set the type/topc you want to clip from, and the time range you want to clip.
Optionally, you can set it to "auto-clip" which transforms ~~~articleclip~~~ within the newsletter with the clip, or you can simple manually clip, i.e. cut and paste the contents of the clip (gotten by clicking Clip Now) into the contents of the newsletter.
- - - - - - - - - - - - - - - - - - - - - - - - - - - - - - - - - - - - - - - - - - - - - - - - - - - - - - - - - - - - - - - - - - - - - - - - - - - - - - - - - - - - - - - - - - - - - - - - - - - - - - - -
TECHNICALITÉS Lettres de diffusion
Database Tables
MySQL
tiki_newsletters
tiki_newsletter_groups
tiki_newsletter_subscriptions
PHP Modules
tiki-admin_content_templates.php
tiki-admin_include_features.php:
tiki-admin_newsletters.php
tiki-admin_newsletter_subscriptions.php
tiki-admin_quicktags.php
tiki-newsletter_archives.php
Newsletters details
tiki-send_newsletters.php
Templates
sent_newsletters.tpl
tiki-admin_calendars.tpl
tiki-admin_content_templates.tpl
tiki-admin_newsletters.tpl
tiki-admin_newsletter_subscriptions.tpl
tiki-calendar_calmode.tpl
tiki-newsletter_archives.tpl
tiki-newsletters.tpl
tiki-send_newsletters.tpl
Permissions
Permission | Effect
| tiki_p_admin_newsletters | Can admin newsletters
| tiki_p_batch_subscribe_email | Can subscribe many e-mails at once (requires tiki_p_subscribe email)
| tiki_p_send_newsletters | Can send newsletters
| tiki_p_subscribe_email | Can subscribe any email to newsletters
| tiki_p_subscribe_newsletters | Can subscribe to newsletters |
Liens utiles
- Le contenu de cette page a été inspiré de la documentation anglophone suivante
- Pour en savoir davantage sur le publipostage des lettres d’informations (infolettres)
- Pour optimiser l’utilisation de ses Infolettres
- Liste des Plugins liés, permettant de souscrire à une infolettre, à l'intérieur d'une page Wiki
- Pour rapporter des bogues ou voir ceux qui ont été rapportés par d'autres (en anglais seulement)
|