Loading...
 

Upgrade 1.9.x to 2.x

This document is intended to those upgrading from a Tiki site running version 1.9.x to the latest 2.x branch, and also to those upgrading from earlier versions of branch 2.x (e.g, 2.0, 2.1) to the latest stable version (2.2, at the moment of writing this note).

Please note that everywhere where it says version 1.10 in the screenshots, you have to read it as if it said the current branch 2.0 (1.10 was renamed in July 2008 as 2.0)

.

First Backup whole filesystem and database
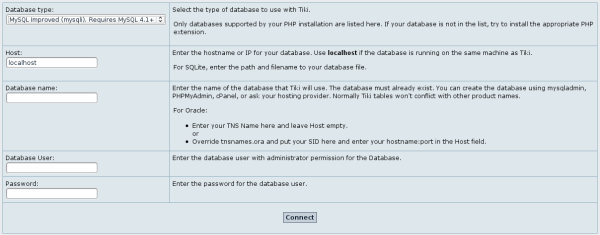
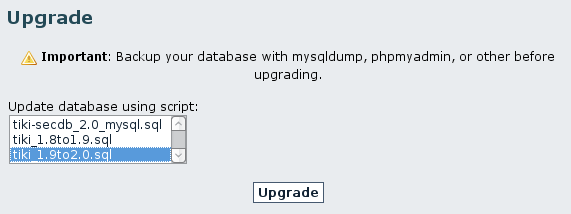
Upgrade:


Download the tar-ball as tar.bz2 or zipped file
or use the svn version

Copy to clipboard
svn co https://tikiwiki.svn.sourceforge.net/svnroot/tikiwiki/branches/2.0


Have it transfered to your server. We assume that you have not changed any tikiwiki-files (php, tpl, ... -files); if you have, then make a backup of your modified files, to put them back to your installation after the basic upgrade is performed.

Upgrade in the same directory

  1. Untar it somewhere
    (windows users might like to use the free software program 7-zip, translated to many languages, for decompressing any of those file formats)
  2. copy it over your existing tikiwiki source (replace files)
  3. New in Tiki >= 2.0rc1: Rename your current ./db/local.php file to something else (for instance, ./db/local_backup.php. Otherwise, the next step might show just a blank screen to you if the database cited in local.php comes from a 1.9.x installation, as it should if your are reading this specific upgrade page.
  4. Run tiki-install.php (or tiki-install.php?lang=XX to have the installation messages in a language other than English, if it has been translated already) to login as admin
    Image
    Image

    After that, you will see the main install & upgrade screen
    Image
  5. If you were not using the latest stable version of Tiki 1.9.x, in Upgrade section, select tiki_1.8to1.9.sql (this will give you the latest DB structure)
  6. In Upgrade section, select tiki_1.9to2.0.sql (This will give you 2.0.y database structure if you are coming from a 1.9.x Tiki, or the latest 2.x structure, if coming from an earlier version of 2.x branch; e.g., from 2.0, or 2.1 to 2.2 or whatever version number is the latest stable version from 2.x branch)
    Image
  7. Click on "Do nothing and enter Tiki", at the bottom of the page
    Image
  8. log into the tikiwiki as admin and check the preferences
  9. empty all the cache in tiki-admin_system.php
  10. done!

Upgrade on another directory/ database

  1. Untar the tar or zip somewhere
  2. Duplicate the database in a new one
  3. Copy db/local.php and update it with the new database name/login/password.
  4. Copy your styles and the templates you have changed in your styles in the new directory
  5. Do the adequate update to the templates of your styles. This can be a difficult task. The best is to diff the templates in the 1.9 directory and to report the change in the 2.x directory
  6. Copy all your local files . Be careful when creating the directory to have them readeable/writeable by the server
    1. File gallery directory
    2. Image gallery directory
    3. see this page for the complete list of directories
  7. Run tiki-install.php to upgrade the database or run
Copy to clipboard
sh doc/devtools/sqlupgrade.sh
  1. Clear the cache

Remarks

Note:

If you were already using some 1.10/2.0 pre-release before December'07, and want to upgrade to the latest 2.0, please note that the permission system for categories has changed (See Categories Details for more details):

  • Assign tiki_p_view_categories, tiki_p_view_categorized to Anonymous or whatever group you need it for.
  • Assign tiki_p_edit_categorized to Registered or whatever group you need it for.
  • Also, the categories are using cache extensively, then think to empty temp/cache/ dir from tiki-admin_system.php after upgrade.


Starting in TikiWiki 2.0, preferences format has changed both in the Smarty templates and the php code. This is to make TikiWiki faster and to make it easier for developers.

  • All preferences variables that you put in your custom template (For example: templates/styles/mycustomtheme/mycustomtemplate.tpl) need to be renamed. For example, $feature_foobar becomes $prefs.feature_foobar.
  • In your customized php code, all preferences must be changed to $prefs'..', for instance $prefs'feature_foobar'. Do not forgot also to change the global to global $prefs when needed.

If you have highly customized Tiki, you may not want to take the time to change them all. In this case, you can use the option below to maintain the previous behavior. Preferences Syntax

Addendum

If you change your mind and you want to make a brand new installation instead of upgrading your existing one, you can click on the "Reinstall database" link on the box on the left at tiki-install.php.

This will allow you to select the type of profile and remove your current tiki installation to create a brand new one from scratch at the same time.

Remenber to backup first, in case you need your old data later on.

Image


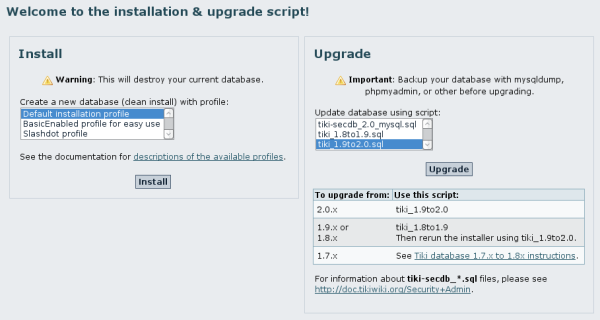
Change in event & calendar permissioms

Between 1.9.x, and 2.x, a new permission, tiki_p_view_events was added. You should add this to the appropriate groups (presumably to those who have the tiki_p_view_calendar permission in 1.9.x)

List Slides