Pretty Tracker in a Wiki Page
is a way to describe the Pretty Tracker functionality pulling tracker fields into wiki pages and displaying them any way you want.
This page explains how to use a tracker with the special field: page selector which allows you to associate additional info to a wiki page via a tracker.
A page selector field looks like a normal text box. The text you type into a page selector field associated that tracker item with the wiki page of that name. If the page does not exist it will be created.
Once the item is saved, and the page selector field matches the name of a wiki page, the tracker item can then be displayed on that page using the PluginTrackerlist.
Diagram
This diagram displays all the pieces required. for more info on the diagram, see pretty tracker.
Tutorial #1 - Different Input and Output Pages
more detail to follow
This tutorial Assumes you have already completed the Pretty Tracker tutorial. You should know how to create a template or TPL page and use it with a tracker.
1. First you need a tracker. Create the tracker and the fields. If it has items or not yet, this does not matter.
2. Create your input template - like you did in pretty trackers tutorial.
3. Add a PluginTracker to a wiki page and refer to the template page you just created.
4. Test your input page to see if it displays the template.
5. Create another wiki page called TrackerName Display TPL.
6. On that page create a PluginTrackerlist with the correct ids for your tracker and fields. In this trackerlist you include the parameter display="wiki:TrackerName Output TPL"
7. more to follow...
Tutorial #2 - Input and Output on the same pages
1. Create a tracker with at least one field on type "page selector"
- Set automatic feeding=1 by typing the number 1 into the field below "page selector"
Example : my tracker 88 has these 3 fields
2. Next, I can paste this code into a new wiki page named Tracker88 and get a Pretty Tracker wiki page.
Copy to clipboard [tracker88]
{TRACKERLIST(trackerId=88, fields=387:388:389, view=page, max=-1, wiki=tracker page selector tpl) /}
!To change the info of the page
{TRACKER(trackerId=88, fields=387:389, view=page)}Info has been changed{TRACKER}
3. To get this code to work with your tracker, you will need to replace trackerId=88 with the specific number for your tracker. To find your tracker ID#, go to your Admin Tracker page and to the left of the tracker name is the Tracker Id#.
4. You will also need to replace fields=387:388:389, with the specific fields for your tracker. To find your tracker field#'s, go to your Admin Tracker page, click on the tracker that you are working with, and then click on this button at the top of the page "Edit this Trackers fields". On this next page, to the left of each tracker field is the tracker field Id#.
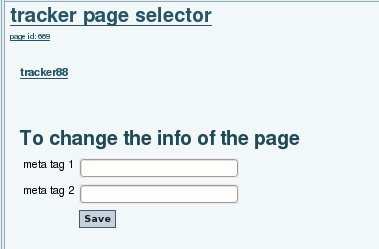
The first time, the page will look like this:
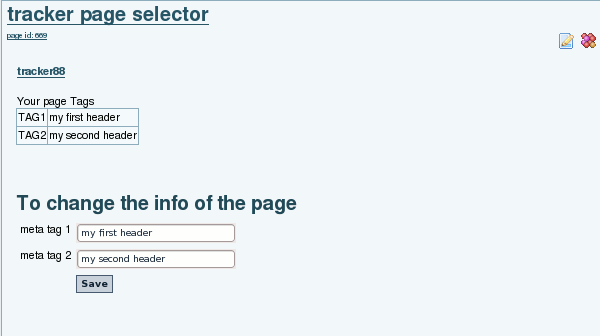
and would look like this after the info is entered
The plugin TRACKERLIST uses the functionality called pretty-tracker that use a wiki page to display the content of an item
The wiki page 'tracker page selector tpl contains:
Copy to clipboard Your page Tags
||TAG1|{$f_387}
TAG2|{$f_389}||
Aliases
Page Tracker
Related
Feature request which motivated this development: Infoboxes like MediaWiki/Wikipedia, but making use of trackers to be future-proof
|