InterTiki
- Overview
- The InterTiki feature allows different Tikis to communicate user data with each other.
- To access
- Click the InterTiki icon
 on the Admin Panel
or
Access http://example.org/tiki-admin.php?page=intertiki
- Tabs
- This page contains the following tabs:Intertiki Client & Intertiki Master Server
- Note
- The information below pertains to using and administering the InterTiki feature. Eventually it will be moved to the new User and Administrator Guides
needs review made major changes to descriptive text, added section for explaining InterTiki fields in detail and mentioned dependency on Log-In authentication type on clients
Introduction
The InterTiki feature allows Tikis to communicate user data with each other. It's based on xmlrpc protocol. It can be extended to several applications if those applications can communicate via XMLRPC. It was introduced to allow cross site authentication in all the tiki.org subdomains.
In Tiki 15 there is a simpler feature called
Remote Tiki Autologin that might provide a less powerful but perhaps easier way from users from one Tiki to login to another
Assumptions:
- The client IP must be fixed to have this feature working
- The InterTiki master must not exist behind an Apache authorization barrier. (htpasswd)
- The InterTiki Master must not use the Web authorization method.
Key Function and sub-features
InterTiki's primary design is meant to achieve master-slave authentication relationships between multiple Tiki sites. It's designed to allow several satellite sites authenticate against one central source for user data.
Additionally InterTiki can be used to transfer user profiles from the primary user source and their corresponding groups. Both of these choices are configurable and allow for a wide range of authentication and user data share paradigms.
InterTiki can be extended for several other purposes with additional custom development utilizing XMLRPC's ability to query just about any asset of user data in a tiki.
Configuration example
In order to enable InterTiki for proper configuration, four key steps are required:
- Enable "InterTiki" in the Tiki feature controls on both the master and slave(s)
- On the "client" Tiki (the Tiki that will be requesting to authenticate against a master) change the "Authentication Method" to "Web Server" in the Log-in feature page.
- Configure the server and client(s) based on the example information below making changes for your deployment where necessary.
Explanation of fields
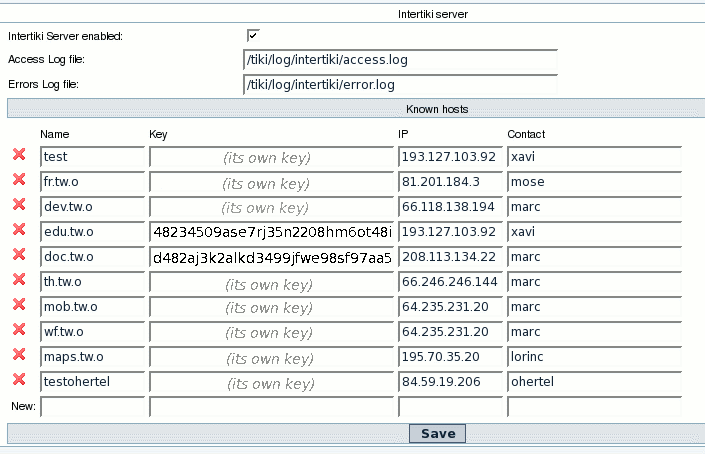
Server Setup
On the machine you will configure to be the primary authentication server (a Master that other Tiki's will request user data from) these are the fields that matter on the InterTiki feature page:
- InterTiki Server Enabled: Check this to make this machine an InterTiki Server
- InterTiki shared cookie for sliding auth under same domain: When enabled a user who logs into or out of any site(slaves or master) is automatically logged into or out of all other sites. (feature rememberme must be on)
- Access Log File: location, from your tiki root dir, where you want the access log file stored.
- a few examples here would be nice. Does this path start with "/" or not. Is it a URL or a direct path to a file from the root of the server?
- Error Log File: location, from your tiki root dir, where you want the error log file stored
The table after allows you to define multiple clients. Only clients on this list will be allowed to make requests against the server. This is useful, and necessary, security feature:
- Name: Arbitrary name used to uniquely identify this configuration (does not effect operation). Recommend use of a name that indicates the client server (ex: doc.tw.o)
- Key: This is the shared key you define. It has to match the client configuration for your server. It can be as short or as long as you like. It is recommended you follow the same kind of password policies your organization would have for something like a wireless WEP key.
- IP: The physical IP address the client machine will be making requests to the server from. If the client is on the same machine, you should be able to use 127.0.0.1
- Contact: username of primary contact on client machine. Useful for adminstration
Client Setup
IMPORTANT: On your client machine (machine that will request auth from the master server) you MUST have set the Authentication Type to "Web Server" on the Log In admin control page or InterTiki will not work.
It is useful to start by first entering the InterTiki Server fields first.
The InterTiki Server fields are for defining for every master server you want to have access to from this client
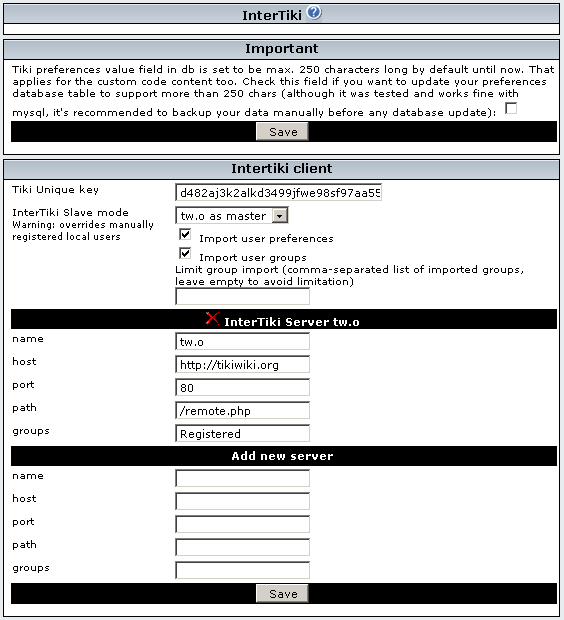
- Name: Set the name of your target server as defined in the server name field of the master. Use a distinct, but easily understood value.
- host: The full URL of the master servers primary Tiki (ex: https://tiki.org).
- Note, even if your Tiki is not at the top level of your web directory, you will still use the site's URL per the ex. above.
- port: The port number the master tiki responds to HTTP on (usually 80).
- Note: HTTP is the assumed method for XML_RPC interchange.
- path: the full path (from the URL root) to the PHP file containing the XMLRPC handler on the server
- EX 1: If the master tiki resides at the root of the site, you would enter "/remote.php"
- EX 2: Say the master tiki is found at http://www.mydomain.com/tiki/mytiki, you would enter "/tiki/mytiki/remote.php" in this field.
- Groups: Groups on the master to authenticate to (only auth users in the groups defined, case-sensitive).
- is this required, or can it be blank?
Click SAVE and then proceed to the upper-half of the InterTiki Client setup screen
- Tiki Unique Key: This must match the shared key entered in the Master's key field.
- xxxxx As Master: Use the drop down list to select the master server you just setup.
- Import User Preferences: Check this box if you want your client Tiki to copy the user preferences from the master server (NOTE: This will overwrite local user preferences every time the user logs in)
- Import User Groups: Check this box if you want the groups the user belongs to on the master server to be imported (along with their security defintions). NOTE: This will overwrite local groups every time a user logs in.
- Limit Group Import: A comma separated list of case-sensitive group names. This list will limit the group import feature to only those groups listed here.
- InterTiki shared cookie for sliding auth under same domain: When enabled a user who logs into or out of any site(slaves or master) is automatically logged into or out of all other sites. (feature rememberme must be on).
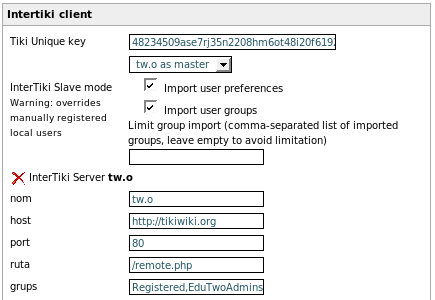
Pictoral Examples
You can see below an example of two Tiki clients (doc.tiki.org, edu.tiki.org]) configuration using InterTiki against tiki.org as a master server.
InterTiki client 1: doc.tiki.org
InterTiki client 2: edu.tiki.org
InterTiki Server: tiki.org
Hosting example
Please find below an example of successful setup at a hosting environment (siteground)
gezzaz notes:
- the setup below is not so much different than above but I was struggling a while to get it right, so I decided to share it. I was stuck with error message saying that the key is not valid but it was entered correctly >> I think I got this error because changing the key on the master side is not performed correctly. You will get the above error if you decide to change your key on the master and make a save. So you have to delete the whole config row on the master and enter the values again if you wish to make changes. On the client side you can change the key without removing the old entry, it got updated for me
- Please interpret mydomain.com to your domain name
Starting ground:
- main domain called "mydomain.com" - this is the master
- a subdomain called "sub.mydomain.com" (defined using Cpanel's Subdomain maintenance feature) - this will be the client
- tiki for mydomain.com is installed in the www root folder (public_html/)
- tiki for sub.mydomain.com is installed in the "subdomain" subfolder of the www root (public_html/subdomain/)
- at master tiki, the InterTiki features is enabled
- at client tiki InterTiki feature is enabled, at Login feature Authentication method option is set to Web Server
|
MASTER settings
| | Name | mydomain.com
| | Key | you choose, for example: 123456789abcdefghijklm
| | IP | the IP address of the server where mydomain.com resides (just ping mydomain.com and you will know)
| | Contact | enter your name or whatever you like, not important
|
|
CLIENT settings
| InterTiki Server section
| (define this first)
| | Name | mydomain.com
| | Host | http://www.mydomain.com
| | Port | 80
| | Path | /remote.php
| | Groups | empty
| InterTiki Client section
| (select this after server is defined)
| | Tiki Unique key | as defined at the master, in this example 123456789abcdefghijklm
| | InterTiki Slave mode | mydomain.com as master
| | Import user preferences | checked
| | Import user groups | checked
| | Limit group import | empty
|
|
InterTiki internal details
Get version : intertiki:get_version
Used for debugging at this time. Future plans include the ability to limit requests based on a minimally defined Tiki version.
Remote login : intertiki.validate
This enables the ability to use a tiki account created on one tiki, at another tiki. One tiki is server, the other is client (client will authenticate against the server). The server has to identify a url where the xmlrpc requests can be reached. The client uses that url to reach server and send xmlrpc requests. (Typically this is: http://yourtiki/remote.php, as the XMLRPC server handler code is located in the remote.php file in your tiki root directory).
The idea is to avoid creating a local account such remote logins. At this time, a local account is automatically created on the client Tiki when a client succesfully authenticates against an InterTiki master server if that account does not already exist. InterTiki clients support the use of the @ as a delimiter for specifying the 'realm' the login belongs to when a user is logging in. This feature is primarily useful if a client Tiki can authenticate against more than one master tiki allowing for complex InterTiki relationships between Tiki sites. Some changes are made here and there to avoid a new client login containing a @ access certain features (like preferences and such).
Upon successful login from a remote intertiki server, the client will log the user into the local client Tiki. If the options are chosen it will also transfer the users preferences and group security settings from the master Interiki server.
Each validation request also sends a hash key that sort of identifies the client server. Eventually the use of that key will be optional. However a good security practice will be to keep it in place, especially if your Tiki is publicly available on the web.
Future enhancements
In the login box a new menu is proposed with that when enabled via login features will list the possible master auth locations, either local or remote. The user could also type login@remote directly it will be processed correctly.
Trouble shooting
- check the IP is the right one by checking the tiki Logs
- check that the error log and the access log are writeable by the server
- if your client does not have a static IP and you need to specify an IP range in the server settings check out a temp fix here: http://dev.tiki.org/tiki-view_tracker_item.php?itemId=1878
Changed client host
When moving a client instance to another host, the client login will not work properly and the access to admin will be not possible. In this situation, just update the new client IP on Tiki master (The address should be something like this: https://example.com/tiki-admin.php?page=intertiki#contentadmin_interwiki-2).
Changed client key and host
When hosting several Tiki instances on one host is common to use a single client key for all instances (not recommended). So, when you need to move a single Tiki instance to another host, it is not possible just update IP for that instance, because it will break all other instances using the same key and old IP.
In this situation, admin is unaccessible and is not possible login on client to fix it. A new key is needed for this Tiki instance and the follow step may solve this situation:
1. Open a MySQL client
2. Select the Tiki database
Copy to clipboard
USE tiki_example;
3. Create another key for your client
Copy to clipboard
UPDATE tiki_preferences SET value=MD5(CONCAT(RAND(), 'example.com')) WHERE name='tiki_key';
4. Check and copy your new key
Copy to clipboard
SELECT * FROM tiki_preferences WHERE name='tiki_key';
A box like below will appear as result of previous command. Copy the value field from it.
Copy to clipboard
+----------+----------------------------------+
| name     | value                            |
+----------+----------------------------------+
| tiki_key | 61d96346b08f9f6633618b8fb678f0c4 |
+----------+----------------------------------+
5. Open browser at keys config page on your Tiki master (Something like https://example.com/tiki-admin.php?page=intertiki#contentadmin_interwiki-2)
6. Scroll down until you see field to a new entry

7. Fulfill it with a meaningful name, paste new key and the new host IP and click on Apply

8. Delete Tiki client cache on new host (-+/var/www/html/+- is the Tiki root folder, change it to reflect you installation)
Copy to clipboard
find /var/www/html/temp/cache -type f -type f -not -name "*.php" -not -name ".htaccess" -delete
9. Now you should be able to login in Tiki client
Related Links
alias